Spare ribs

Sunshine at last!!

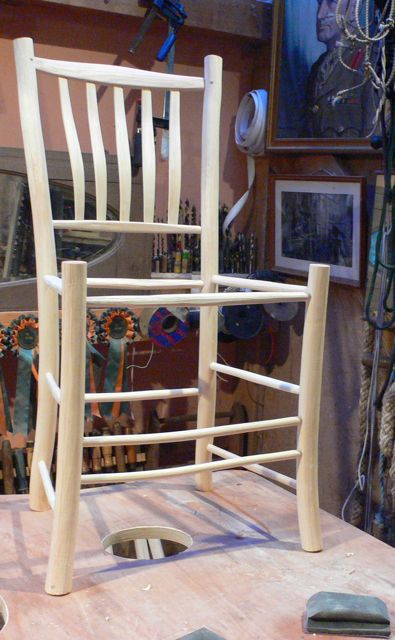
After 4 days of dismal, damp weather, yesterday (Wednesday) we had a warm, sunny afternoon and I was able to take a few more photos of my chair-making. On Sunday, Monday and Tuesday, I had assembled a chair each day.Three Chairs

Because they are made with very tight joints, it is a bit tricky squeezing the frames together single handed, having to hold the chair and the rung, while having to wind the handle on the sash clamp. On the courses we always have at least two people (if not three) working together on this operation. On the chairs that I make for sale, I like all the components to be as delicate as possible, so there is a likelihood of the rungs flexing while being squeezed into place, especially with the long slender front rungs. If they have a natural curve, then that just adds to the difficulty. For those of you who are planning to make chairs like these, I suggest making the front rungs no less than 18mm diameter in the centre, tapering down to the 16mm tenon at each end.

Nearly straight rungs

Side rungs for three chairs

I had made some spare side rungs, some of which had quite distinct curves along their length but I selected the straightest ones in order to reduce their flexing during assembly. They still have enough inherent character to distinguish them quite clearly from lathe turned produce.

Spare ribs

Having assembled all six back panels last week, I was intrigued by their appearance as they lay in the drying rack and realised that they reminded me of a rack of spare ribs. It is this lightness and flexibility combined with the elastic strength of good ash timber that makes these chairs far and away my favourite chair to produce. I spent a happy 15 minutes trying to capture this feeling by photographing them in sunshine on our trampoline.

Spare ribs in the sunshine3 racks of spare ribs

These cross rails are too delicate to be squeezed in with the usual extra-large tenons, so by running the 9/16″ (14.3mm) tenon cutter over them before assembly, they just squeeze perfectly into their 14mm holes.


Putting it all together

Saturday 12th was a day off but I was back in the workshop again today (Sun 14th) – the other side of the coin, when running your own business. The first thing was to drill all the mortices in one of the side panels. This was pretty much by the book ‘Going with the Grain’, lifting the back of the chair by 5cm, marking out where to drill, then gripping the frame to the bench. Having reflected on my comment about it being too scary to do all the drilling with a Forstner bit, I tried it on a scrap piece and it seemed OK, so I thought I’d try it for real today. It was no great ordeal – it burned the wood a little where the depth stop rubbed but that could easily be shaved off. I’ve laid out all the tools that were needed for this particular process.

Drilling into one of the side panels

Here are the stages in creating the mortice for the crest at the top of the back leg.

The lump of wood with a big nail in it is a ‘centre finder’, which when used with the sliding bevel (on the right) marks a point showing where to drill the angled holes. The little thing between them is the same 14mm bundle of nails that I used for marking the mortices for the laths  a few days ago. Tapping this little bundle on top of the nail hole shows where to drill the two holes of the mortice. I used the 12mm chisel to clean out the mortice after the 2 holes had been drilled. It looks a mess here but a few strokes with a spokeshave cleans it all up nicely.

Marking out an eliptical hole for the F-clamp

When drilling the second panel, I decided to make a new hole in the bench to enable a clamp to grip the front legs to the bench. I like making it an ellipse, which is very easy to do with a couple of nails and a short length of string. I could probably calculate exactly where to put the nails and how long the string should be but I went for trial and error. The first attempt was too small for the clamp but the second attempt was fine. I could have made it more elliptical by shortening the length of string. (See the new hole in the pics below)


I thought it worth using the dummy method described in my book ‘Living Wood’ to perform a trial assembly with dummies to take the place of the front and back rails and rungs – the same length but smaller tenons (so that they can be easily removed again). The frame is held together with bungee cord, so that I can measure the lengths for the cross rail and the crest. I had made the crests over-length (just in case) so I cut them shorter according to the lengths given in the book – which was reassuring.

After spending some time shaving and sanding all the components, I then squeezed it all together and fitted a couple of 5.5mm square walnut pins into 6mm holes at the top to hold the crest in place. (The little grey pad, bottom right is one of the wonderful Abranet pads for sanding everything).

Not counting the two walnut pins, that’s 22 components and 36 holes to create a remarkably robust structure out of very little wood but a lot of time and effort.

I just need to trim the tops and bottoms of the legs before oiling the frame and weaving the seat but I’ll hope to assemble the other 5 chairs first.


Making chair rungs & rails

Today started by steam-bending the last set of laths. Before I could do this, I took out the 2 sets that I bent on Sunday and fitted them into the setting jig. They needed packing out with a some slices of thin plywood to retain maximum bend.Laths in their setting jig

To make the side rungs and seat-rails for the 6 chairs, I used a log felled this April that had been cleft in half when making legs in a course this summer. It was 18cm (7″) diameter and I cut 3 lengths of 38cm (15″). As with the wood for the legs, this was best split into thirds. In theory, each third would yield 5 rungs and 3 seat-rails.

After cleaving the first of these lengths it looked as if I had the blanks for 6 seat-rails and 11 rungs, with 5 lengths of rejects – either run out during cleaving or defects in the wood.

The results from cleaving the first bit of log

By the time I had shaved them, this had gone down to 6 seat-rails and 9 rungs.

Rungs and rails after shaving

The beauty of working green wood is that one can happily reject anything that’s not right for the job. I had been thinking of cutting all of my spring-felled logs into firewood, so getting a load of chair parts out of this log is a bonus. Because it had been felled 8 months ago, I then left these shaved blanks in a tub of water for several hours. The idea was for them to soak up some moisture so they would swell a little. Then when I cut the tenons with the tenon cutter, they would shrink to the desired size. (After taking the photo, I placed a weight on them to hold them under the water).

The rung & rail blanks soaking

Those 3 sections of the half log just yielded the 36 side rungs and rails plus 4 back seat-rails and are now drying in the racks above the wood-burning stove.