It’s a Wonderful Life

For those of you who have been avidly waiting for the latest episode in my chair-making saga, I have to apologise for getting rabbled up in preparations for Christmas, so my chair-making blog has been temporarily put to one side.

I’ve done my best to listen to the reading of Rob Penn’s book on Radio 4 each morning this week.

Rob's book
The Man who Made Things out of Trees

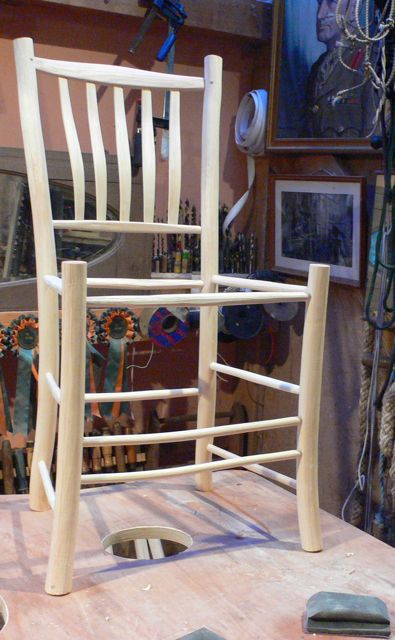
On Monday, Tamsin was helping me to weave the seat on a chair, when the first episode was aired. It first I was taken aback by the voice. In the Radio Times it had said that Rob was going to be reading it but instead of his  gravelly voice was the refined reading voice of Andrew Lesser (I think I’ve got that right). I found it hard to imagine the owner of this voice wielding a chainsaw, while crashing his way through a Welsh woodland. Having got over that disappointment, we enjoyed listening to Rob’s eloquently written, entertaining story, with Tamsin commenting that this was more like the kind of book she would read, rather than my sort of book.

I missed Tuesday’s episode but made a point to listen to Wednesday’s, which was all about his visit to Robin Wood’s bowl turning workshop. Whenever I have a radio programme I am keen to hear, I make sure I have a good pile of washing up, to keep my hands occupied, while my brain is soaking up the airwaves……………

Believe it or not, this is where I stopped writing this blog yesterday to make the morning cuppa and didn’t get back to it till this morning, having just read Robin Wood’s blog about ‘Doing what you love’……………………………

Just as the story got to the bit where Rob (Wood) made 3 cuts on the base of the bowl as his maker’s mark. I realised I was washing up one of Rob’s bowls that we use daily, along with several other pole-lathe-turned bowls by Ben Orford, Owen Thomas, James Wilkes, Steve Tomlin and Barnaby Carder (made long before he was Barn the Spoon). Not to mention a set of plates turned by Rob and even a few rare Mike Abbott plates, as well as a collection of wooden spoons and spatulas.

A Selection of treen in the Abbott household

I couldn’t resist taking this photo – but after consideration, I refrained from posting it, as it might look like I was trying to outdo Rob Penn. Since reading Rob Wood’s blog, I’ve given up on trying to conceal my competitive instincts!! http://www.robin-wood.co.uk/wood-craft-blog/2015/12/26/do-what-you-love/. It appears that fast cars, big houses and wads of money have now been overtaken by handmade wooden artefacts, big log-piles and good friendships as the ultimate status symbols. This is surely no bad thing!

Back to Rob Penn’s book……on Thursday morning I was enjoying hearing all about the process of steam-bending ash when used in the construction of toboggans, when the phone rang. I thought it’s probably someone called Peter or David, with a strong Indian accent wanting me to take part in a survey but I dragged myself away from the washing up and answered it anyway. It was a good friend of Tamsin’s phoning with a progress check on his wife who had recently been rushed to hospital with severe heart failure a few weeks before her 80th birthday. As a fully paid up member of Dignity in Dying – an organisation fighting for the legalisation of assisted suicide – I find the idea of fading away with heart failure just before my 80th birthday a pretty near ideal way of parting from this world……….but when it’s a friend who was sharing lunch with you 10 days earlier, somehow the theory and the actuality seem totally incongruous. What do you say to somebody who is about to loose his partner after over half a century of a loving relationship? Steam-bending bits of ash suddenly seemed completely trivial.

After lunch we dragged in the somewhat reluctant teenagers to watch the classic film ‘It’s a Wonderful Life’ starring James Stewart playing a man who has sacrificed all his dreams of traveling the world and living the high life to carry on the work of his father in running a savings and loan company in small-town America. He is driven to the point where he contemplates suicide but is saved by a guardian angel and it all ends happily – an amazingly powerful film, showing how precious a seemingly ordinary life can be. (It would make an excellent party Political broadcast for Jeremy Corbyn’s Labour Party).

So at 3am on Friday morning (Christmas Day) we were woken by Nettie, our teenaged daughter freshly back from her first term at university, saying that she was worried about a strong pain in the left side of her chest. We phoned NHS 111 (a very helpful service) who made an appointment for her at Hereford Hospital at 9.10 in the morning. We duly set off, each armed with some reading material to pass the waiting time.

Norwegian Wood

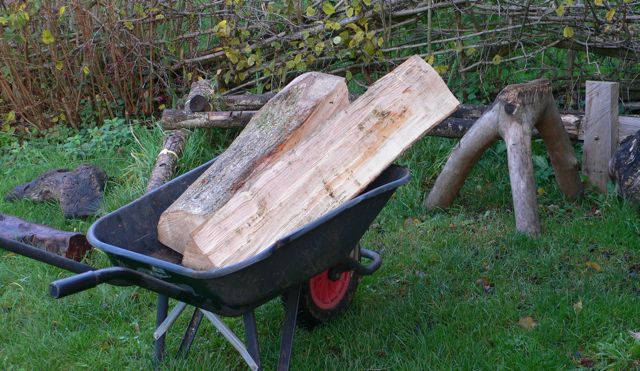
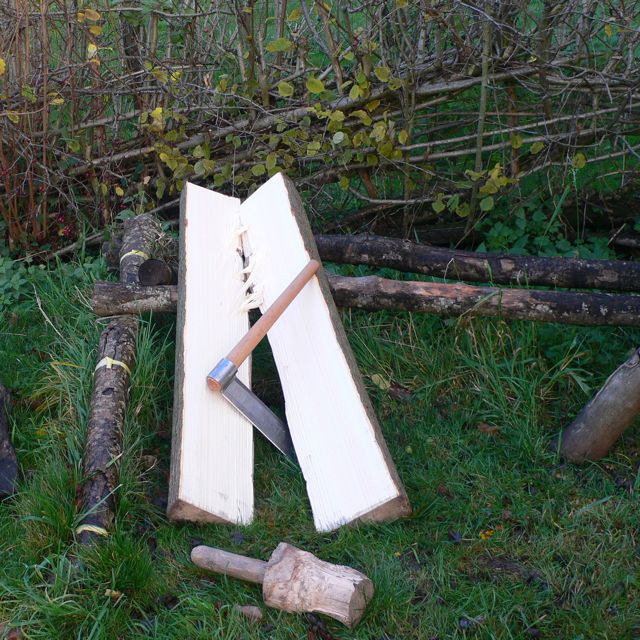
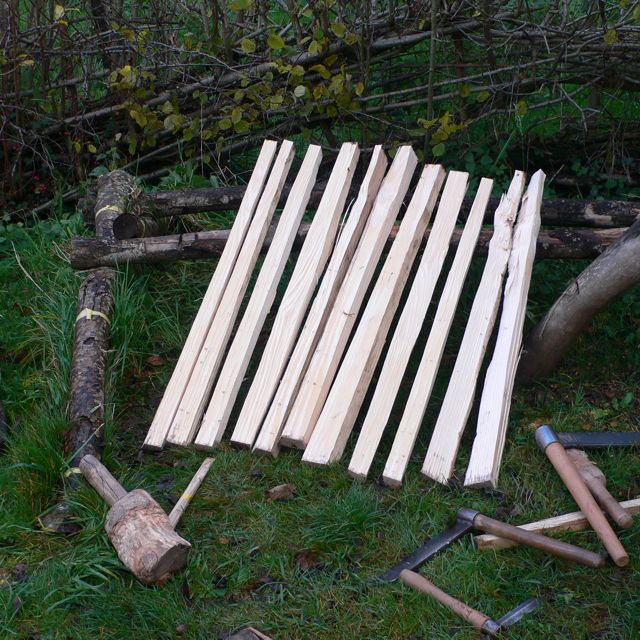
My book was a copy of Norwegian Wood by Lars Mytting, all about the delights of harvesting, splitting, stacking and burning firewood – now an international best-seller – beautifully written and very informative. Nettie read ‘Down and out in Paris and London’ by George Orwell.


After seeing the only other out-patient, the doctor was able to take his time, explore all the possibilities and conclude that she was in fine health and had simply suffered from an attack of heartburn. We called into the nearest filling station to buy some Rennies when I noticed it was exactly 9.45am, just in time to drive home listening to the final episode of ‘The Man Who Made things out of Trees’.


It was great to know that all the regular listeners to Radio4 would now be aware of just how many things could be made out of an ash tree (even if chairs were pretty well ignored – I’m hoping Rob’s sequel will be ‘The Men and Women who make Chairs out of Trees’).

However, I have to admit that the details of the construction of Rob’s writing desk were overshadowed by contemplations on the meaning of life and how fortunate are those of us who enjoy a healthy, harmonious and fulfilling life.


Advertisement

Spare ribs

Sunshine at last!!

After 4 days of dismal, damp weather, yesterday (Wednesday) we had a warm, sunny afternoon and I was able to take a few more photos of my chair-making. On Sunday, Monday and Tuesday, I had assembled a chair each day.Three Chairs

Because they are made with very tight joints, it is a bit tricky squeezing the frames together single handed, having to hold the chair and the rung, while having to wind the handle on the sash clamp. On the courses we always have at least two people (if not three) working together on this operation. On the chairs that I make for sale, I like all the components to be as delicate as possible, so there is a likelihood of the rungs flexing while being squeezed into place, especially with the long slender front rungs. If they have a natural curve, then that just adds to the difficulty. For those of you who are planning to make chairs like these, I suggest making the front rungs no less than 18mm diameter in the centre, tapering down to the 16mm tenon at each end.

Nearly straight rungs

Side rungs for three chairs

I had made some spare side rungs, some of which had quite distinct curves along their length but I selected the straightest ones in order to reduce their flexing during assembly. They still have enough inherent character to distinguish them quite clearly from lathe turned produce.

Spare ribs

Having assembled all six back panels last week, I was intrigued by their appearance as they lay in the drying rack and realised that they reminded me of a rack of spare ribs. It is this lightness and flexibility combined with the elastic strength of good ash timber that makes these chairs far and away my favourite chair to produce. I spent a happy 15 minutes trying to capture this feeling by photographing them in sunshine on our trampoline.

Spare ribs in the sunshine3 racks of spare ribs

These cross rails are too delicate to be squeezed in with the usual extra-large tenons, so by running the 9/16″ (14.3mm) tenon cutter over them before assembly, they just squeeze perfectly into their 14mm holes.


Putting it all together

Saturday 12th was a day off but I was back in the workshop again today (Sun 14th) – the other side of the coin, when running your own business. The first thing was to drill all the mortices in one of the side panels. This was pretty much by the book ‘Going with the Grain’, lifting the back of the chair by 5cm, marking out where to drill, then gripping the frame to the bench. Having reflected on my comment about it being too scary to do all the drilling with a Forstner bit, I tried it on a scrap piece and it seemed OK, so I thought I’d try it for real today. It was no great ordeal – it burned the wood a little where the depth stop rubbed but that could easily be shaved off. I’ve laid out all the tools that were needed for this particular process.

Drilling into one of the side panels

Here are the stages in creating the mortice for the crest at the top of the back leg.

The lump of wood with a big nail in it is a ‘centre finder’, which when used with the sliding bevel (on the right) marks a point showing where to drill the angled holes. The little thing between them is the same 14mm bundle of nails that I used for marking the mortices for the laths  a few days ago. Tapping this little bundle on top of the nail hole shows where to drill the two holes of the mortice. I used the 12mm chisel to clean out the mortice after the 2 holes had been drilled. It looks a mess here but a few strokes with a spokeshave cleans it all up nicely.

Marking out an eliptical hole for the F-clamp

When drilling the second panel, I decided to make a new hole in the bench to enable a clamp to grip the front legs to the bench. I like making it an ellipse, which is very easy to do with a couple of nails and a short length of string. I could probably calculate exactly where to put the nails and how long the string should be but I went for trial and error. The first attempt was too small for the clamp but the second attempt was fine. I could have made it more elliptical by shortening the length of string. (See the new hole in the pics below)


I thought it worth using the dummy method described in my book ‘Living Wood’ to perform a trial assembly with dummies to take the place of the front and back rails and rungs – the same length but smaller tenons (so that they can be easily removed again). The frame is held together with bungee cord, so that I can measure the lengths for the cross rail and the crest. I had made the crests over-length (just in case) so I cut them shorter according to the lengths given in the book – which was reassuring.

After spending some time shaving and sanding all the components, I then squeezed it all together and fitted a couple of 5.5mm square walnut pins into 6mm holes at the top to hold the crest in place. (The little grey pad, bottom right is one of the wonderful Abranet pads for sanding everything).

Not counting the two walnut pins, that’s 22 components and 36 holes to create a remarkably robust structure out of very little wood but a lot of time and effort.

I just need to trim the tops and bottoms of the legs before oiling the frame and weaving the seat but I’ll hope to assemble the other 5 chairs first.


Drilling into the legs

Today (Friday) was another half day (one of the perks of running your own business), so with the rungs and rails nicely dried out it was time to start assembling the side panels for the chairs. Over the years, I’ve experimented with all kinds of drills, both powered and manual. My current approach may sound time consuming and cumbersome but once in the rhythm, it doesn’t take long and it enables me to drill good deep 25mm holes into 35-38mm legs without having to worry about the drill popping out the far side. Having measured the distances up the legs (today I used 11, 29 & 47cm, which allows a bit extra for trimming the bottom of the legs after assembly) I drill a pilot hole with a 4mm bit in a cordless drill. I then do the bulk of the drilling with a 14mm auger bit in a hand brace. I stick a yellow tape at 26mm but this isn’t really needed because I actually count the rotations and stop after about 16.


I then finish each hole using a 14mm Forster bit in a mains drill with a lump of wood fixed to the drill to act as a depth stop – quick and reliable without any danger of bursting out the far side. Why don’t I do all the drilling with this? Too fast and scary. By using the brace and bit I can take care to judge the drilling angle by looking in a couple of large mirrors and using a wooden angle guide. Here’s a picture of the bench (taken when sharpening my chainsaw) with two large mirrors to judge the angle, when I’m using it for drilling. My grandfather is keeping a watchful eye on things. The picture beneath him is one of Philip Clissett in his workshop. I’d love to know how he did his drilling! I do know he used a brace with a spoon bit but there’s no sign of any mirrors – and certainly no chainsaw!

Wshop mirrors

Having drilled 3 pairs of front legs, I then set up the back legs fixed to their bending jig on the bench. these holes are drilled at 30 degrees to the vertical, which gives the back of the chair a good splay.

P1060237

I then gave the dry rungs and seat-rails a good clean and some sanding and squeezed together two pairs of side panels – after 10 years of using this approach it still requires some courage to see it through. Here’s a couple of minutes of film works taken during a course in 2011.


More fine tuning

Apologies to all of you who are avidly following this unfolding story of the birth of a set of chairs – I missed my blog last night. Today I only got a half day in, so you haven’t missed much. Yesterday (Weds) I achieved my assembly of the two last panels in the allotted 3 hours (inspired by The Great Pottery Throwdown the night before), so I then had all 6 panels assembled.6 back panels assembled

In the afternoon, I took two of them to pieces, and with a spokeshave, a scraper and two Abranet pads (amazing pads with course and fine abrasive sheets held on with velcro), I then had to reshape and smooth each lath and the cross-rail. I have left cleaning up the crests until I have fitted the ends into the back legs, which is some way off yet. Here’s a pic of one set of laths shaped to fit into their mortices, and another set having subsequently been reshaped and smoothed off. Can you tell the difference? I bloody well hope so!

Two sets of laths at different stages

Today (Thurs) was the most dismal day so far this winter (only 0.2 KW hours all day from the solar panels capable of generating 2.75 KW/hour). Forunately the recent wind had died down so with the shaving-horse snuggled up close to the wood-burner and with the i-pod generating a good rhythm for sanding, I kept myself comfortably warm.

Shaving horse snuggled up to the stove

If any of you (either of you!) know the music of AltJ, try sanding a piece of wood while listening to this song of theirs: http://www.azlyrics.com/lyrics/altj/thegospelofjohnhurt.html. I was off on a kind of red Indian – sorry – native American chant. I’ve no idea what the lyrics are about but they are very relevant to a green woodworker.

In the meantime, I had put all the rungs and rails made on Monday into the oven of our Tyrolia kitchen stove (wood-fired of course) just on tick-over. After a day at about 80 degrees C, they had dried beautifully, with the tenons shrinking to a good oval cross section of about 14.4mm by 15.3mm, pretty well perfect to squeeze into the 14mm holes I shall be drilling in a few days. I’ve put them back into the rack above the living room stove, so I can get a beef casserole on the go for Saturday, when we have friends to visit for lunch.Rungs and rails going into the kitchen burner to dry

Assembling the back panels

This series of blogs is partly a record for me and any interested colleagues of how I make lath-back chairs in a production run (albeit 6 at a time) and also for my customers to see how their chairs are coming along.

Yesterday I finished making the last of the parts for the 6 chairs, I intend to make before Christmas. Most of them have spent some time drying around our wood/burning stove. As well as the bits I have made over the last few weeks are 4 crests and cross rails I made 3 weeks ago.


So today’s project was to assemble 4 back panels while all yesterday’s rungs and rails are drying. I suggest starting with one of the crests, as the mortices will be less obvious, so by the time I get to the cross-rails (where the joints are more obvious) I should be in the flow. The mortices are spaced 6cm apart and marked with a bundle of nails (leftover from nailing floor boards) which punch a line 14mm long. A neat idea is to use 6mm drills at each end of the mortice with a 5mm drill for the centre hole. This removes a lot of the waste but minimises the danger of the centre hole being slightly out of line.

Using a 12mm chisel, a thin mortice chisel and a gimlet, I removed the waste from the mortices.

After running a spokeshave along the surface, the mortices were relatively neat.

5 mortices drilled and cleaned

After the 4th crest had been morticed, I started on the cross-rails. Rather than holding these using a shallow bending jig, I made a special grip to hold the cross-rail when carrying out the morticing. This held it more firmly, which makes a big difference.

a cross rail in a softwood jig

With 40 mortices  made it was then a matter of shaping the laths to fit each one individually. This was the first time this project became rather tedious. Listening to BBC Radio 4 was not a good idea as I nearly nodded off at one stage. After a cuppa, and a blast of Bundhu Boys from the i-pod, things picked up. I thought of old Philip Clissett who is quoted as saying ‘if you are not singing, you are not happy’. He’d have certainly preferred the i-pod to Radio 4. I also thought of my son, Dougal on his X box game, going over and over the same challenge, trying to knock a second off here and a second off there. Refining the process is an integral part of any craft, be it Warcraft, chair-making or pottery.

Having fitted the end 2 laths and the bottom of the centre 3 laths, I could measure the exact lengths of the centre ones before wasting time shaping their tenons and then having to cut them to length. By the end of the day I had succeeded in assembling the 4 panels but there’s still a great deal of cleaning up to be done before final assembly.


Making chair rungs & rails

Today started by steam-bending the last set of laths. Before I could do this, I took out the 2 sets that I bent on Sunday and fitted them into the setting jig. They needed packing out with a some slices of thin plywood to retain maximum bend.Laths in their setting jig

To make the side rungs and seat-rails for the 6 chairs, I used a log felled this April that had been cleft in half when making legs in a course this summer. It was 18cm (7″) diameter and I cut 3 lengths of 38cm (15″). As with the wood for the legs, this was best split into thirds. In theory, each third would yield 5 rungs and 3 seat-rails.

After cleaving the first of these lengths it looked as if I had the blanks for 6 seat-rails and 11 rungs, with 5 lengths of rejects – either run out during cleaving or defects in the wood.

The results from cleaving the first bit of log

By the time I had shaved them, this had gone down to 6 seat-rails and 9 rungs.

Rungs and rails after shaving

The beauty of working green wood is that one can happily reject anything that’s not right for the job. I had been thinking of cutting all of my spring-felled logs into firewood, so getting a load of chair parts out of this log is a bonus. Because it had been felled 8 months ago, I then left these shaved blanks in a tub of water for several hours. The idea was for them to soak up some moisture so they would swell a little. Then when I cut the tenons with the tenon cutter, they would shrink to the desired size. (After taking the photo, I placed a weight on them to hold them under the water).

The rung & rail blanks soaking

Those 3 sections of the half log just yielded the 36 side rungs and rails plus 4 back seat-rails and are now drying in the racks above the wood-burning stove.

More chair-making

Today I returned to the workshop to work on the other section of the tree that I barrowed up the the workshop on Friday. It was a quarter of the very bottom section of the tree, which I marked with the ‘curtain ring’. Unfortunately it just yielded 7 rather than 8, so I cleft it into 3 rather than the preferred 4. I then marked each third to give 4 legs.


After cleaving I had the front leg blanks for the 6 chairs, which I plan to make before Christmas.

6 pairs of front legs

While I was doing this, I had the chair legs, crests and laths from Friday, gently steaming away. Top right is the wallpaper stripper feed steam down the flexi pipe into the plywood steam box that I resurrected. In the woods we had been using a box made of 2″ insulation boards but that was in a poor state, so I’ve used those boards to lag the stronger plywood box. The big advantage of the foam box was that it was very lightweight and easy to lift on and off the wood-fired drum. Now the steam box is fixed, that’s not an issue.

Using pretty much the same jigs as in Going With the Grain 2nd edition, I bent 3 pairs of back legs, 3 sets of laths, 3 cross-rails and a couple of crests. These are now drying around our woodburning stove in the living room.

The afternoon was spent shaving the 6 pairs of front legs, following the gentle curved that came from the butt end of the tree. I tried using a 1 1/2″ tenon cutter to size the tops of the legs.

I concluded that was a waste of time and used the ‘curtain ring’ as with the back legs. These legs will now be dried gently along with all the steamed bits. The shavings will sit outside being dried by the strong wind and will be ready to use for kindling within days.

Kindling wood produced on Friday


Making chair legs

Yesterday I had a lovely day outside my workshop starting to make use of the ash logs I collected in the rain a few weeks ago making things out of trees. I had stacked the logs carefully as they had come out of the tree trunk.

an ash tree stacked under cover.

I barrowed one of the sections from the best section together with a section from the butt section up to my cleaving brake outside the workshop. (In fact I didn’t get round to using the butt section).

 2 sections in the barrow

Using a selection of three froes, I cleft the section to yield the material for 6 long legs plus lots of other bits. It was surprisingly sensitive to pressure from the froe, which is why I used the micro froe for the later stages, so that the split wouldn’t run too far along the log before I could control it’s direction.

cleft in half with very big froe Starting to cleave the second halfThe blanks for 6 legs plus 5 other lengthsP1060127


Four of the legs came from just under the bark and had perfect grain. The other pair were from the inner section and had a slight wiggle near one end so I cut them shorter………..and the sun came out – wonderful! I made a peg to hold the ‘curtain ring’ which is the gauge to determine a uniform thickness for the leg.


Sunshine at last a curtain ring peg


However perfect the grain may appear, it is never going to be perfectly straight, which is why the process of cleaving and shaving has the advantage over sawing and turning to maximise the strength of the fibres running along the whole length of the leg.

wood is never dead straight


Out of the other 5 lengths I was able to make 6 front seat rails and 16 laths (to be bent in the next day or so at the same time as the legs.

16 back laths 6 front seat rails


I also managed to make a couple of crests and a back seat-rail out of the remainder as well as 2 large tubs of kindling and a few little bits of firewood but it was to dark to get a pic by then.

A wonderful way to spend a relatively benign December day.