
It is now a month since I completed the construction of the new shelter in our garden but the weather has been so wonderful and the days have been so long, that I haven’t found time before now to put it on my blog.
I’ll keep the words to a minimum but here are a few of the many photos.


Back in the winter I had made a scale model to give me an idea of what I would need in the way of timber and what sized tarpaulin. As the project got underway, I had a few significant rethinks: I bought some softwood poles to supplement the sweet chestnut and I went for as much triangulation as I could fit in. It still bears a resemblance to the model.


I decided that 10mm steel bolts would be the most suitable fixings with the surfaces flattened at each joint. The sloping ground was an issue to resolve. The site for the shelter drops about 50cm over the 8metre length of the shelter and that would entail a huge amount of earthworks to level the ground by hand. Most buildings stick to vertical uprights to support horizontal beams rather than following any sloping ground. I decided to follow that principle, which would mean the shelter being higher at one end than the other.


A standard length for buying timber is 16ft (a bit under 5 metres) so by joining two lengths at the front and back I could span an 8metre tarpaulin. By combining this joint with an X-frame support it worked very neatly with my previous workshop when using squared timbers. I had found that commercial 4″x2″ timbers were nothing like as strong as roundwood, so I had to saw some flat faces onto the poles before they could be connected. A long 7/16″ auger bit was just right to make the holes for the 10mm bolts – one of the delights of our ‘Impetric’ system of measurement! For the initial work I had the assistance of Roger, a veteran from many spring ‘development weeks’ plus some help from my son Dougal.


To erect the top beams at the same time as the X-frame, I needed a team of several people. Fortunately Tamsin had a visit from a couple of fellow artists, Sarah and Juan as well as Juan’s sons, who were only too happy to help out and the operation went sweetly.


Fitting the rafters was a surprisingly easy one-man operation, although I had to shuffle around the A-frame so that the front horizontals were level and parallel, achieved by using the two end rafters as giant rulers. Only when I was happy with the positioning was I able to firmly pound the soil back into the holes at the base of the uprights.


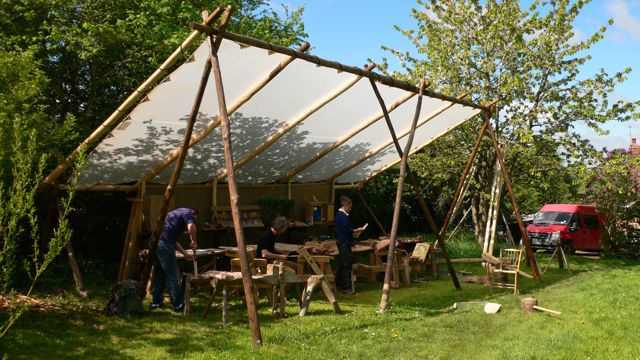
Will, Bryce and Penny took a break from Brookhouse Wood to help lift the 8m X 4m tarpaulin into place and we fixed it using a length of 10mm bungee cord woven from one of the top corners through the eyelets (@ 50cm spacing) around the poles and tied off in the opposite bottom corner.


When I took a photo the next day, I glanced across at our neighbour’s solar panel array and realised that it was much the same size and angle as the shelter roof. I’ve seen flexible, transparent solar panels and hope that one day a shelter like this would be able to generate enough electricity to run a simple workshop.


So by my 65th birthday, a week before the start of my first course of the summer, the main structure was in place. All I had to do was make a path to the site for the dining shelter and put some shelving along the back. For this, I was able to use some surplus chestnut poles and 4 ash planks that had been milled about 8 years ago. I was also able to use up a gallon of Cuprinol preservative (which I had been saving since I finished supervising a youth training scheme in 1984) to coat the beams and the shelving.

You must be logged in to post a comment.