Ongoing developments 2021

In my previous blog, I wrote about the system I developed for assembling chairs in the autumn of 2020. In February, I put these latest developments into practice and made a couple of chairs for my wife, Tamsin.

The completed spindle-back chair

Changing the splay of the seat

In fact, I made the front of this chair 3cm narrower than my normal chairs, so that it would fit into the leg-room space in an office desk. This resulted in less splay, which changed the options for the weave of the cord seat. I used a pattern often referred to as herringbone but is technically a 2:2 twill (you might notice the influence of my earlier years of laying paving stones in a herringbone pattern). The new geometry meant that it worked well in blocks of four, with 2 binds at the back and 4 binds at the front – all even numbers, so I played about weaving with the cord doubled – an experiment worth repeating.

Using natural dyes

Back in 2014 we went through a phase of using natural dyes on the chair seating on courses, so that autumn Tamsin and I read Jenny Dean’s useful book Wild Color and coloured some cord using onion skins, walnut husks, buddleia seeds and berries (damson & elder).


Tamsin weighing buddleia seeds for dyeing


Strips of dyed cord


We used some of it for 3 chairs but the remainder had been cluttering up my workshop for over 6 years, so I finally put some of it to use – onion skin for the warp and berries for the weft.

2:2 twill pattern with natural dyes


Due to the ongoing lock-down with covid, I had set my programme of courses to start in Mid June but when April arrived with a week of glorious sunshine, I felt I just had to get out running courses again. A batch of chance enquiries led to me planning ‘The Wych Elm Project’, felling a wych elm tree in a nearby woodland, stripping the bark, converting the stripped logs into a couple of chair frames, then using the bark to make the seating, the whole process to be professionally filmed by John D McHugh. We hope that the finished film will be available when it is all edited.

The fruits of The Wych Elm Project

I still had a month before the first scheduled course, so I was able to slot in another one-off course for a couple, which had been originally booked before the whole pandemic arose. In the meantime, the couple had produced a baby, so it seemed obvious to make her a high chair and if time allowed, also a nursing chair. By now, we had saved up a jarful of onion skins with which to produce some coloured Danish cord.

A bowlful of boiling water and onion skins

It produced a glorious brown seat, which echoed the brown surface on the arms which were obtained from a perfectly curved hawthorn branch cut out of the hedge. The low nursing chair was assembled and seated with the same pattern. It will work well as it is but hopefully the proud father will add a pair of rockers when he finds some spare time.

Ben, Sarah & Sophie with their chairs

So at last on 14th June, I got underway with the first of the scheduled summer courses and we spent the first two days as usual, making all the components out of ash logs felled earlier in the year. On day three, I had to remember the latest techniques for assembling the chairs and together with the group, see if we could make any improvements. One of my aims has been to enable all the drilling to be done vertically, as this is much more straightforward when it comes to sighting. If you return to the previous blog, you can see the process developing but we still hadn’t sussed the two different angles needed when drilling the back legs.

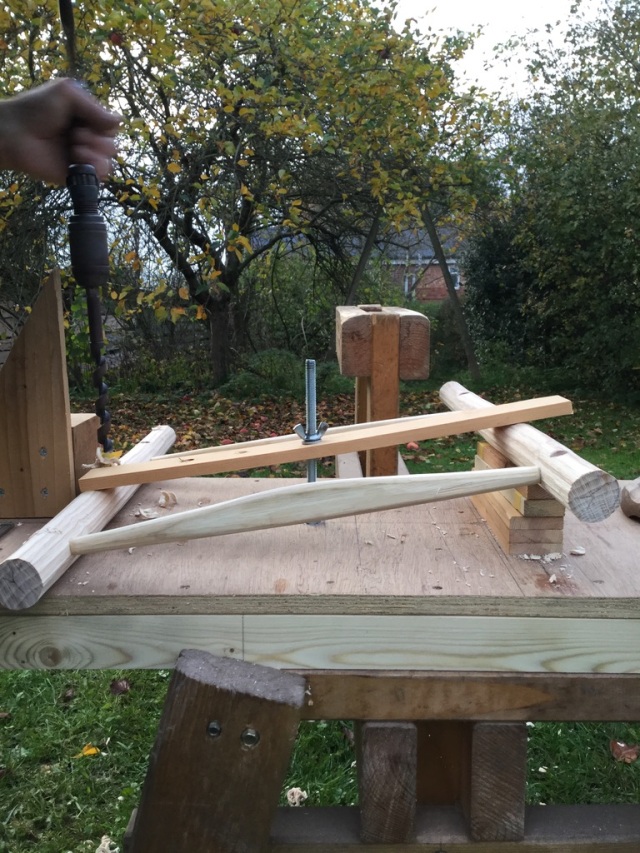
One of the beauties of running courses is that we work on several chairs in succession, so we can implement any good ideas that crop up, then while it is fresh in the mind we can adapt as necessary for the next one. For chairs 1 & 2 we played with some ideas which worked OK but by chair 3 we arrived with a method we really liked, if for no other reason it was elegantly simple. Having drilled the holes for the bottom rung and seat-rail, we simply inserted a 30mm block beneath the bottom of the legs to rotate them in the jig. The photos below show the two different setting for the two pairs of holes.

drilling back legs, phase 1
Drilling back legs phase 2

All this probably means nothing much to you readers but to me and maybe one or two others, this could herald a revolutionary breakthrough in the history of greenwood chair-making!

Here are the resulting assembled back panels at the end of day 3:

End of day 3

Day 4 could now be spent assembling the front panel and then drilling and squeezing the whole lot together:

Testing the strength of the front panel
Drilling into the back panel
Squeezing together the front and back frames

When the frames were all assembled, they were oiled, ready for seating on day 5. Charlie had to leave in the early afternoon, so I was unable to picture the completed chairs together but here they are at 2.30pm:

The chairs nearly finished

The bark-seating on the left was still awaiting the corners filling. Red-beard’s chair is a wavy twill pattern with a warp dyed with leftover onion skins and a weft dyed with Van Dyke crystals, the simple weave and the more elaborate ‘Brookhouse weave’ are both dyed with leftover onion skins.

We have now used our supply of onion skins, so if you are ever coming on a course and you fancy a coloured seat, then save up all your onion skins – both red and white – just the dry crinkly ones!
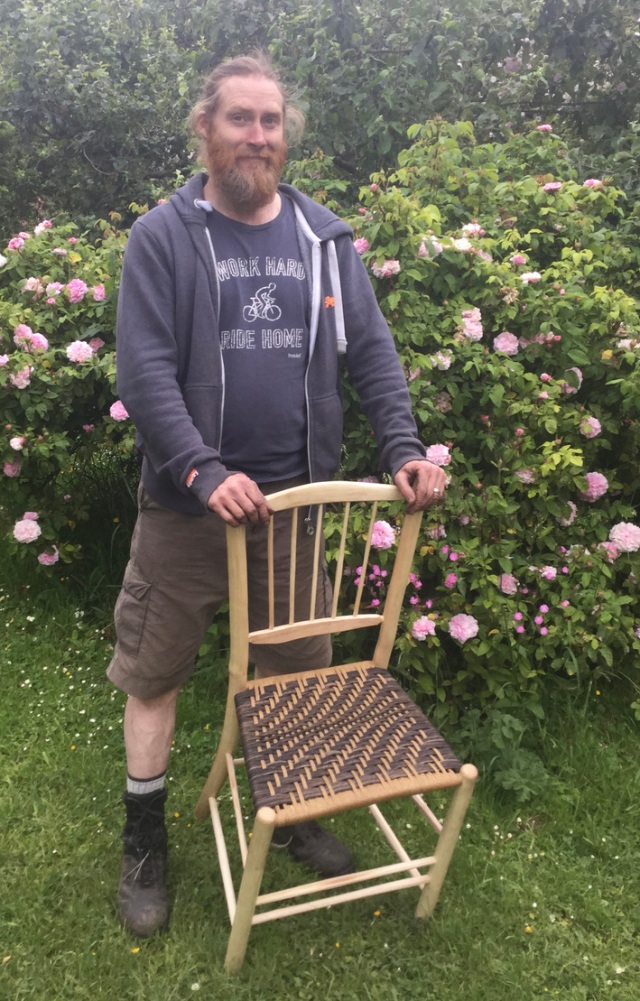

Red-beard with his wavy twill seat completed

A new approach to chair assembly

Reverting to the old ways

I have called this blog ‘A new Approach to Chair Assembly’ but in fact it is a description of how I reverted to the more usual method of assembling a frame chair, that is to assemble the front panel and the back panel first, and then join them. This is the approach I described in my first book, Green Woodwork which was published way back in 1989 and it is the way we assembled chairs on my courses for the first 10 years or so. Here is a photo of the chair made by Tamsin when she attended her first course in 1993, which is still in daily use.

Tamsin’s first chair

Sometime in the 1990’s, I switched to the approach of assembling the two individual side panels and then joining them. This was described in books by the American green woodworkers, Drew Langsner and Roy Underhill, so following my desire to try out alternatives, I thought I’d give it a go. In the general scheme of things it is not a great difference and as it worked OK, I adopted this approach and I described it in my two subsequent books, Living Wood and Going with the Grain.

Time for a rethink

During the summer of 2020, I had time to consider this approach and decided to experiment during the few courses I was able to run due to coronavirus. The starting point was to place a completed chair onto a bench with props beneath the appropriate points where I knew the length of the components as described in my books. We start with one of the front legs flat on the bench. The front rungs are 45cm, while the back ones are 35cm. 45 minus 35 makes 10. By lifting the back of the chair by half this difference (i.e. 10 divided by 2, equals 5cm) the front and back rungs and rails will be vertical. I find to difficult to explain in words why this works but if you doubt me, try it out! Using the same reasoning, with the crest being 43cm (subtracting about 1cm for the bend), then that point should be lifted 1.5cm (half of 45 minus 42).

Propping the chair on a bench

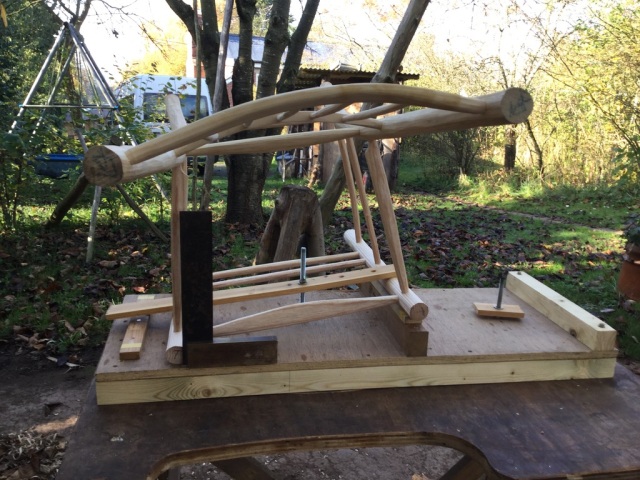
To cut a long story short (3 months of constant experimentation), I decided to build a ‘drilling platform’, which enabled me to fix various battens and insert a couple of bolts to hold the back legs in place during the drilling process. It needed three fixed points to locate the legs consistently (for the same reason that 3 legs are more stable than 2 or 4) . The breakthrough came when I abandoned one of the 5cm blocks illustrated above and substituted a block for the bottom of the leg as illustrated below. By placing a completed chair frame with its front leg at the same level as the drilling platform, I established the thickness of the new block by trial and error until the frame sat without wobble, with the front and back rungs vertical. With a new leg in a matching position it looked like this.

A chair frame laid on the ‘drilling platform’ to see how to position the back legs

Now by replacing the assembled frame with the matching back leg it looked like this – something really quite elegant, I thought!

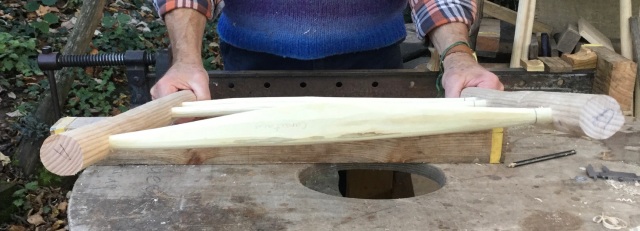
A pair of back legs gripped ready for drilling

The mathematician within me then simplified it slightly by subtracting 15mm from each support, going from 15, 50 & 30 to 0, 35 and 15. Tamsin pointed out that not everybody has access to a planer-thicknesser, so I made use of some assorted bits of 12mm and 15mm batten. By moving the bottom block to 90cm from the top edge (the height of the hole for the crest), the legs were now able to simply rest on the top of the platform as shown below.

Drilling the holes for the back rung and seat-rail

I had played about with the idea of rotating the legs slightly, so that the top two pairs of holes (for the curved crest & crossrail) could be drilled vertically. Eventually I settled for the old method of drilling them at an angle, such that one end of the crest is vertically above the other end (as described in Going with the Grain)

Drilling the top holes at an angle
Offering up the spindle panel

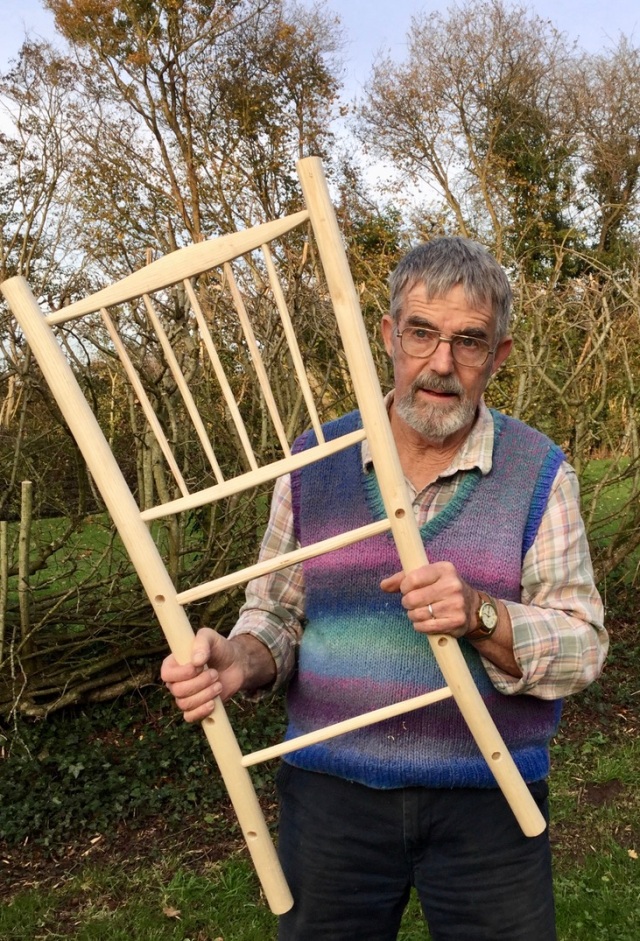
With these  four holes drilled into each of the back legs, the back frame could then be assembled. The rear seat-rail and the back rung were squeezed into their holes using the same method I have used for the last 20 years: the tenons being shaped with a 16mm tenon cutter while they were green, then dried so they shrink to an oval, then squeezed into a 14mm hole. Because the top two components (crest & cross-rail) have been steam-bent to a curve, it helps to shape their tenons with a 9/16″ tenon cutter. This is the equivalent of 14.3mm, so this will still result in a tight joint but not ultra-tight like the lower components. It is not too difficult now to assemble this back panel single-handed, while checking that it isn’t twisted out of square. (See what I mean below with the front panel)

Checking the back panel isn’t warped during assembly

Assembling the front panel is now straight-forward.

Drilling into the front legs

As with the back panel, check that the frame is not twisted when you squeeze it together.

Make sure to straighten any twist
The front panel assembled

To deal with the splayed shape of the chair, it is now a matter of supporting each panel at an angle, so that the remaining holes can be drilled vertically. Using the calculations at the beginning of this blog (45 – 35 divided by 2 equals 5cm) the back panel needs to be lifted on one side by 5cm. In practice, what I did was to lift the lower side by 15mm so that it was clear of the bench. Then I lifted the other side with a pile of laths (3x12mm plus 2x15mm making 66mm in total) resulting in a height difference of 51mm (that extra mm is not significant!). These bits of lath are 18cm long, the same as the spacing between the side rungs) with their ends positioned beneath the holes for seat-rail and the centre rung, as shown below.You need to make sure that you are drilling just into the correct leg in this position, then change the tilt for drilling into the other leg.

Here is the back panel with 6 holes drilled for the side rungs and seat-rails, with the correct splay.

the back panel with 6 holes drilled

Now to drill into the front panel. I could see no obvious calculation for the lift of the front panel but because it is wider than the back panel it needs more lift. I drew it on some graph paper, which gave me 65mm, so here’s a completed chair in one of the earlier experiments to check that’s right .

A chair frame positioned to show the 65mm lift needed

Using the same bits of lath, I lifted one side by 65mm (well, 3×12 plus 2×15 equals 66)

The front frame gripped with one side about 65mm higher than the other

Obviously you need to remember to drill the correct leg in order to get the correct splay. If you are like me, you will have to get it wrong at least once for the lesson to stick!

Once both panels are drilled, I strongly advise you to get some help to squeeze the whole frame together!

Assistance is needed for the final assembly

I’ve had 8 weeks to finish this blog but in the meantime, things have changed, so I’ll post it now, then do an update another time!


Coping with covid

As I write this, it now seems that autumn is with us with gales and blustery showers. Since lock-down at the end of March, the weather has been at least a month ahead. Most of the last 5 months has been spent in my garden.

Good grief!! Looking back through my photos over this time, I can’t believe how much has happened. I’ve built a whole new veg garden and a path, patched the clay floors and laid some land drains. With our son, Dougal, (whisked away from Bristol just before lock-down to complete his degree online) I collected some fabulous ash logs and planted spuds and peas (including mange touts), which we have now eaten along with a glorious crop of cherries.

However the main purpose of this blog was to let you know that courses are underway again. David along with his son for the first two days, made the components for a couple of chairs. When his son had to leave, I assembled the components for one chair, then together David and I seated them with slight variants of the wavy twill pattern.

David with two lath-back chairs

By now the runner beans had turned from delicate little frost-bitten babies into giant monsters looming over my workshop demanding to be harvested every two days, then sliced, blanched and frozen to nourish us over what I am certain will be a harsh winter.

The runner beans after 3 months of loving attention

The runner beans, struggling after a late frost in May

Plums, lettuce and carrots abound while the autumn raspberries are now ripening and the first apples are starting to fall.

Fine young carrots

The first of this autumn’s raspberries

Blenheim apples nearly ripe

The second course was with Suzi (a woodworking novice) and her partner Joe (an experienced furniture maker)

Suzi & Joe with their chairs

Although I suggest beginners (like Suzi) make a simple spindle-back chair, Joe and I agreed that he would be well-able to make a more time-consuming lath-back. I gave a little help when Suzi needed it and I also learned several wood-working tricks from Joe (like using an iron to raise the grain when wood has been squashed).

Ironing out the dents left by squeezing the frame together.

By Thursday evening they had assembled their frames so that Friday could be spent weaving their own unique variations of the wavy twill seats.

Suzi’s version of the wavy twill pattern

I have now harvested just a few of the damsons growing at the top of the garden and together with some apples, have now made a dozen jars of jam for use over the next year.

Damsons ready for jam

Damson & apple jam

I fully appreciate that compared to most people, we have been incredibly fortunate over the period dominated by covid 19. We have been able to pass our time in a beautiful rural garden, walk the local footpaths freely and continue with a creative, fulfilling way of life. What happens next year, let alone beyond that, nobody knows.

Writing this blog has reminded me of the words of the deceased chairmaker John Brown, ‘I live in a beautiful place, I work at something I love, I make enough money to live, and my demands on the world’s resources are very meagre’.

In May 2021 I shall be 70 and my relatively slowly advancing multiple sclerosis is unlikely to have diminished but I hope that I shall be able to run a full programme of courses, if only for the 20 or so people booked for this year, who I have had to disappoint because of covid 19!

You can’t judge a tree by looking at its bark!

Ash trees in Meephill coppice

I had last set foot in Meephill Coppice in May 1999, when it was up for sale. It had been planted mainly with conifers but it also contained some fine young ash trees which were a mixture of coppice and natural regeneration. As it turned out, it was eventually purchased by my former colleague, Gudrun Leitz along with the much larger, neighbouring Childer Wood (see ‘Living Wood’ pages 41 & 42). As I started setting up for my fourth year of courses at Greenwood Cottage, very nearly 20 years later, Gudrun invited me to look through some of the ash logs that had been felled over the winter by our mutual colleague, Crunchie together with his wonderful horses.

Crunchie and Mike coming back from the woods in 2015
A collection of logs ready to be picked up
The logs loaded for home.

I measured the volume of each log and after arriving home and cleaving them, I sorted the good chair-making logs from the inferior wood, which was valued as firewood (there is no such thing as ‘waste’ in the greenwood world!)

A log with a rotten centre

This log looked straight with no obvious knots but was very slow grown (which in ash is a bad quality), so mostly went as firewood

wispy fibres – a sign of tough chair-making wood

These whispy fibres signified that this wood would have the elastic strength for which ash is renown. Because the pith was off-centre, it wasn’t ideal for cleaving the long slender back legs of chairs, so it was cut into shorter lengths for the other chair parts.

Good, straight, tough, fibrous ash-wood
a straight, symmetrical log, ideal for back legs of chairs

This log, wasn’t so fibrous but it was more regular in its growth and would prove good for cleaving in metre lengths for back chair-legs

half of each of these two logs.

Despite thirty years working with this stuff, it is still difficult to ascertain the specific quality of a log by looking at its bark.

The logs, cleft in half and stacked under cover by the stream

So, log by log, I stacked them in a cool, dry, shady spot between my workshop and the adjacent stream.

Since then, they have been used with varying success over seven 5-day courses to produce 27 unique heirlooms for their delighted makers.

May 24th
June 7th
June 26th
July 5th
july 19th
August 9th
August 23rd

That will do for the moment!

News: ‘Make a Chair from a Tree, Third Edition’ and Video

I dropped on this blog when searching for John/Jennie’s book today. John and I met when I was in the USA in ’93 and corresponded since then, especially when I was working on the 2nd edition of my book ‘Going with the Grain’. He/she (how else should I word this?) was an inspiration to me and always very helpful and informative. RIP

Lost Art Press

JA_yard3_IMG_8687 Built in Baltimore. While many people associate Jennie Alexander’s chairs with country woodcraft, she lived in urban Baltimore, where she developed the design for her chair.

For the last five years, we worked with Jennie Alexander to revise her classic “Make a Chair from a Tree” book to her satisfaction and include all her latest thoughts and approaches to building her iconic ladderback chair.

Jennie’s efforts were assisted primarily by chairmaker and friend Larry Barrett and Jennie Boyd, who cared for Jennie Alexander in her Baltimore home during her final years.

JA_chair_IMG_8643With Jennie Alexander’s death this summer, we had to evaluate the future of the book. Could it be completed in a way that would make Jennie happy? Did we have the support of people who could help us finish the book? Did we have the support of the family and heirs?

The good news is that we are now…

View original post 419 more words

Famous authors making chairs!

In 2017 Tamsin‘s friend Jackie Morris visited us with her partner Robin and they thought it would be fun to bring along a couple of their friends on a 5-day course to each make a chair. Over the intervening year Jackie’s many years of hard work have been rewarded by the acclaim of her latest book, a collaboration with Robert Macfarlane entitled Lost Words.

Monday, the first day of their course arrived, as did Jackie & Robin with their friend Astrid, a skilled woodworker, who is always keen to try new aspects to her craft. The fourth member of the group was Nicola Davies another successful author and TV presenter, who unfortunately missed the first day due to sickness. This gave me the rare opportunity to work alongside Jackie, Robin and Astrid, starting to make some of the components, which Nicola supplemented with her own endeavours when she arrived on Tuesday.

After a short introduction to the techniques of working with green wood, the team were given some sections from an ash tree, sourced from a nearby woodland belonging to Herefordshire Wildlife Trust.

Using a ‘wedge on a stick’ normally called a froe, they ‘cleft’ the log in half and then in half again until it yielded the wood for a pair of chair legs. Then, using a shaving horse and drawknife, they shaved the rough blanks to shape to be steam-bent to produce the familiar gentle curve of a comfortable country chair.

By Thursday, they had all assembled the back panels to their chairs and were ready for the final assembly. The first stage was to drill at an angle into their pair of back legs. While the driller(s) used a traditional brace-and-bit to drill, two others would sight up their alignment to ensure they were drilling at exactly the desired angle – ‘left a little, up a little – DRILL!’

Formation drilling
Jackie and Robin drilling their back legs

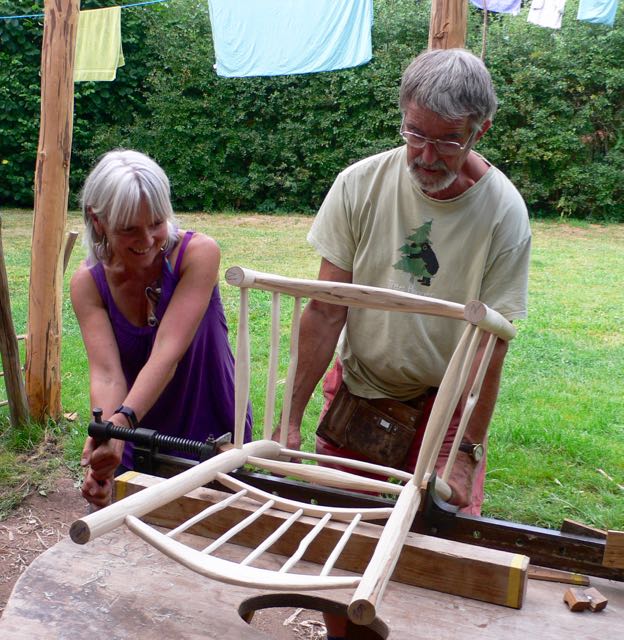
Once the holes had been drilled, the chairs were assembled, panel by panel, until the final squeeze, using a powerful clamp.

Squeeezing!
Nicola squeezing together the components for her chair

The final job on Thursday afternoon was to oil the chair frames, so as to be dry again for  the seat to be woven the next day. While Robin was still furiously sanding his components, he was banished to the adjacent lawn (watched adoringly by our dear old dog), in order to prevent fine clouds of dust defiling the smooth, sticky surfaces of the womens’ frames.

Oiling
Robin banished from the workshop while the others apply a coat of oil

On Friday morning, the team each chose their preferred seat pattern and by the end of the day we were able to admire the fruits of a fulfilling week. It was hard work for all five of us but every course is different and every chair is quite unique, encapsulating an experience that is all too rare in our modern, hi-tech computerised world.

The finished chairs
Who would believe what can be made from some logs and some cord?

As Nicola so sweetly summed it up: ‘I had the most wonderful week. It was totally absorbing – wonderful to be doing something in which every part of me was engaged. I adored the physicality of it.’


What does Mike do in the winter?

I am frequently asked how I pass the time during the winter months, when I am not running courses.

Winter writing

Since 2002, when Tamsin and I produced our book Living Wood, I have often spent winter months working on new editions of this book or the newer one, Going with the Grain, which we published in 2011. After four editions selling 9000 copies, we now intend to let Living Wood go out of print. (As I write, there still around 50 copies remaining, so get in quick!) The second edition of Going with the Grain still has around 100 copies in stock and it seems popular enough to warrant a third edition. Over the intervening five years with over 300 new chairs being made, many improvements have evolved, and I’d hate it if these weren’t properly documented. So that’s a bad-weather job for the next few months.

Winter wooding

What else do I do? For my ten years at Clissett Wood and my first five years at Brookhouse Wood, much of my winter was taken up with woodland management and harvesting wood for milling, making chairs and for firewood. I described this in chapter 5 of Living Wood, summarising what I believed would be the ideal scenario. Being no longer involved with a woodland is a mixed blessing – no longer able to select the trees I wish to fell but also no longer having to swing a chainsaw and large lumps of wood in the cold winter weather – nothing finer though, for a fit young man!

Building sheds

However, I still enjoy sawing and splitting the firewood for our home, and in 2012 with the help of my son Dougal, I built a woodshed with two south-facing bays for storing and seasoning firewood.

This has worked very well but I had also been using another adjacent old shed that was steadily collapsing, so this winter I decided to demolish part of this shed and double the size of the newer woodshed.

I took the opportunity to remove the previous corrugated sheets, added four new sheets and increased the overhang of the roof to prevent southerly winds blowing rain onto the drying logs. Oh, how I missed the assistance of my teen-aged son, now studying music in Bristol. Instead, I had to drag Tamsin away from her creative stained-glass work to steady the poles and to pass up the corrugated sheets. Ten days without rain enabled me to take my time and to process the dry, wormy old timbers into superb kindling.

Keeping warm

So much for the dry weather and the extra overhang! Thanks to ‘The Beast from the East’, all that kindling now has a good coating of snow.  Nevertheless, Tamsin has been able to keep warm burning bits of dry old shed, while working away in her studio on some gorgeous pieces for the Blue Ginger Gallery, which re-opens with ‘meet the makers’ on 17th March. Meanwhile I have been able to sort through the backlog of paperwork in the living room, while building up an improving relationship with the new wood-burning stove that we fitted last year.

As I write, it is just starting to thaw and I can return to planning this year’s changes to the summer shelter and dining area, which are looking distinctly sorry for themselves under a carpet of snow. The new tarpaulin (twice the size of the current one) is still in its snow covered bundle waiting to emerge like a dragonfly, when the warm sun returns. I shall retrieve the set of chairs over-wintering with Ed & Rowena and hopefully greet their return with a new ash dining table to replace the disastrous attempt from 2017.

It’s hard to imagine right now, that in 11 weeks, when the courses start again in May, we’ll be out in the warm Herefordshire spring air again…………

The Greenwood Cottage workshop 2017
The early stages of a chair-making course

……………but that’s the delight of the cycle of an English year!

A brief look back at 2017

So far as Abbotts Living Wood was concerned, 2017 wasn’t as bad a year as everybody else seems to have experienced. From a personal point of view, my participation in a number of successful collaborative projects has given my semi-retirement a whole new direction.

Apart from one course in June, when we had to wrap up the shelter in a huge tarpaulin to protect us from a cold, wet north wind, the courses went well and are currently fully booked for the 2018 season.

A cold day in June
A cold day in June

The Exhibition at Tinsmiths celebrating Philip Clissett’s bi-centenary went OK and my talk attracted a hall full of people, who seemed to enjoy it. I didn’t sell any of my chairs though.

In October I took some chairs across the county to the amazing home of Ed & Rowena Waghorn, who’s house build claims the record as the longest build in the whole history of Channel 4’s Grand Designs. The results are absolutely stunning.

P1100422
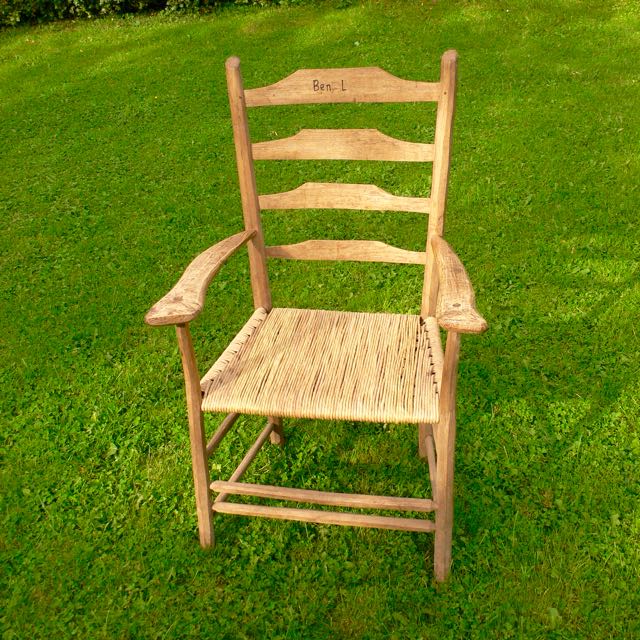
An armchair by Ben L for Grand Designs

Hoping for a bit of product placement I took across 5 dining chairs made either by assistants or myself but I was hoping the armchair made by Benny Lawless (assistant from 2007) would catch the eye of Kevin McCloud, reminding him of his favourite episode at the build of Ben Law’s woodland house. I think there were 3 split-second glimpses of the green wood chairs but no flood of orders!

Having re-established a working relationship with Gudrun during the Clissett exhibition, we collaborated again on a weekend of activities entitled Winds of Change celebrating the 30th anniversary of The Great Storm of 1987. Our belief was that this storm marked a new awareness that wood (the most sustainable of raw materials) actually does grow on trees and can be used for a wide range of fulfilling crafts. We worked this in as part of the prestigious sculpture exhibition entitled Out of Nature, run by Jenny Watts together with Bronte Woodruff at the magnificent Newport House, north of the city of Hereford.

P1100511

This biennial exhibition raises funds for a project called The Cartshed, which provides a range of outdoor activities (including green woodwork) for local people with mental health issues.  We were fortunate to be joined by Jackie Morris, who gave an enlightening talk on Sunday about her work, writing and illustrating books, the latest being her joint work with Robert Macfarlane, the best-selling Lost Words. It was a surreal few days, with tropical balmy weather over the weekend, followed by a storm on the day of the anniversary, which hit Ireland full blast but struck Herefordshire with an unworldly red sun – seen here balanced on Jackie’s finger.

P1100549
Jackie Morris with the red sun balanced on the tip of her finger

As soon as we had we recovered from the weekend, I dived headlong into my new role as political agent for the local Green Party in a by-election campaign for the local council. When we moved here in May 1997, not only had New Labour swept to victory in the General election but we also discovered that we had a Green local councillor called Guy Woodford. Our Utopian vision was later shattered, in part by the Iraq war and in part with Guy’s defeat by the Tories in a subsequent election. So now at the age of 82, he leaped back into life in support of the new candidate, Ellie Chowns in her attempt to regain the seat for the Greens.

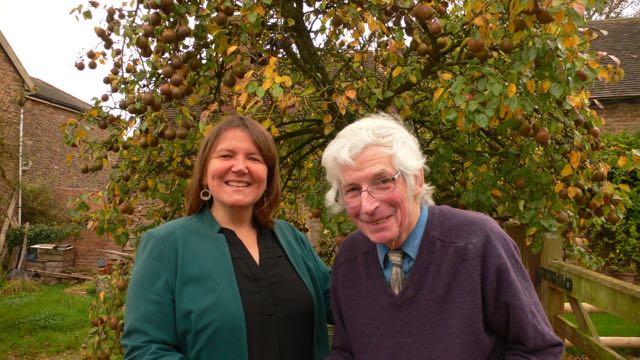
Beneath the pear tree
Green councilors, past and present

Ellie made for a great candidate, intelligent and articulate, with many years experience in working for underprivileged people around the world.  She was surrounded by a great team with decades of experience provided not only by Guy but also by Pete Blench who has masterminded three recent Green victories in nearby Leominster. West Midlands HQ provided support from the effervescent Peggy Wiseman, who worked long and hard to encourage the country-folk to adopt some smart, modern campaigning techniques. My job was to make sure that the word reached every household in the ward by coordinating a small army of volunteers, who appeared from every corner of the surrounding countryside to distribute election literature. Much to everybody’s astonishment, Ellie won with a substantial majority.

At 66 years old, I have spent over half my life encouraging enthusiastic volunteers to help construct a series of sylvan idylls in Bristol, Devon and Herefordshire. I now see that in my new-found semi-retirement, I can put this experience to a not unrelated purpose; helping in a small way to continue a gentle political transformation in a quiet corner of rural England.

An exciting October!

Autumn will kick in with three exciting events, which should appeal to anyone interested in this blog. Click onto the links for lots more details:

Out of Nature

The biennial sculpture exhibition is back again running from 1st to 22nd October, with a special Winds of Change weekend over the 14th & 15th, marking the 30th anniversary of The Great Storm of ’87, when trees crashed their way back into the consciousness of the English nation, easing the way for the resurgence of interest in woodlands and related green wood crafts. This weekend will feature an all star cast including Jackie Morris, Archie Miles, Rob Penn (all signing their latest books – lovely Christmas presents!) and several leading wood crafts people (including myself).

Chapel Lawn Woodland Fair

A one-day event in Shropshire on 7th with a host of woodland activities. I shall be going along in the afternoon with one of the three chairs I have made from a wych elm tree that grew in the village of Chapel Lawn.

ALICE

An exhibition of art inspired by the work of Lewis Carroll starting on 21st. Tamsin is helping organise it and will be entering some of her imaginative glass panels.

Drink me bottles

I am pulling together some other chair-makers to enter a selection of hand-made chairs (to go with the Mad Hatter’s tea party), which will be for sale. Details are still to be finalised but tickets are now available for a couple of fascinating evenings related to Alice.

I hope to see some of you at one or more of these.

Making chairs by hand

After the successful launch of the Chair exhibition at Tinsmiths in Ledbury, I took a trip to visit a couple of colleagues who run chair-making courses to take some photos for my forthcoming presentation on 15th July about Philip Clissett and his chair-making legacy.

P1100031

First I called on Tim Gatfield, who had attended a course with Gudrun at Clissett Wood about 15 years ago and after a few years as her assistant, he purchased a woodland just north of Bath. With the help of many volunteers, he has built a beautiful set-up of workshops, round-houses and cabins in which he hosts a series of green wood courses at The Cherry Wood Project throughout the summer.

P1100038P1100062

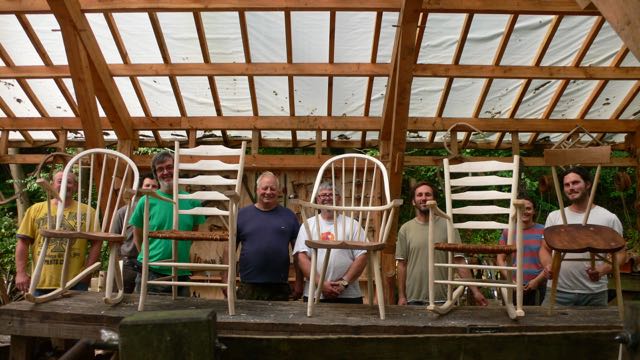
I arrived during the last few hours of a 9-day chair-making course. Three participants had already left but the others kindly posed with Tim and his two apprentices, proudly displaying the splendid results of their time in the workshop.

A couple of years ago, after quite a struggle, he obtained full planning permission, not only for his woodland work and the courses but also for a large yurt in which he lives with his wife and their two children – a well-deserved reward for years of hard work. After an evening meal with Tim and Debs and a night in one of the cabins, I lit the fire for a cuppa and some breakfast ready to set off for my next port of call at Westonbirt Arboretum.

One of my last photos at Cherry wood was the compost toilet, situated across a suspended walkway among the trees. I couldn’t help but contrast this with a structure linked to the recent extravagant tree-top walkway recently installed by the Forestry Commission. 24 years ago, I spent a few weeks in the autumn at the arboretum with my then girl-friend Tamsin, producing baby-rattles on the pole-lathe to sell to the streams of visitors coming to see the autumn colours. How things had changed since then! Instead of a tiny kiosk with one attendant, I was greeted by a huge entrance building with automated turnstiles.

P1100069

I found my way to what until recently had been Westonbirt Garden Centre, which closed and was then used as a builders yard during the construction of the spectacular tree-top walkway.

P1100072

Now the yard was in operation as the base for Windsor chair-making courses run by my colleague Paul Hayden, who had attended one of my courses way back in 1989. I couldn’t help being stuck by the contrast between Paul’s ‘builders yard’ and Tim’s ‘woodland idyll’ but they are both equally valid embodiments of a genuine enthusiasm to convey the delights of working with greenwood.

P1100075

I took this photo looking down from the walkway as Paul was just getting underway with the start of a six-day chair-making course. Although he has been running courses at Westonbirt with his colleague Peter Murray for several years, Paul’s enterprise is about to take a leap forward when he hopes this summer, to gain planning permission to turn his ‘yard’ into a full blown green wood centre with a permanent workshop, a sawmill and a shop. With the arboretum catering for around half a million tree-lovers each year, most of whom will walk across the tree-level walkway to gaze down onto Paul and his chair-making students, I’m sure Paul will play a major role in keeping alive the tradition of making chairs by hand.