
Updates to my book, Going with the Grain
I wrote Going with the Grain over the winter of 2010/11 to make the most of my ’10 minutes of fame’ as the judge at the end of the BBC 2 programme, Mastercrafts, hosted by Monty Don. (I have to say this is a brilliant piece of TV, especially the final 10 minutes!)
In 2012 with the help of friends and family, we produced some very basic videos of the woodland courses in action, which were condensed into Chairs from the Woods then a year later, a professional team spent a few days capturing the atmosphere of my woodland workshop, resulting in this beautiful short film, Green Wood. At the same time we published an updated 2nd edition of Going with the Grain.
In September 2015 after 30 years of woodland courses, I moved my courses back to a shelter in our cottage garden, where I have continued to run courses, scaled down for just four people at a time.
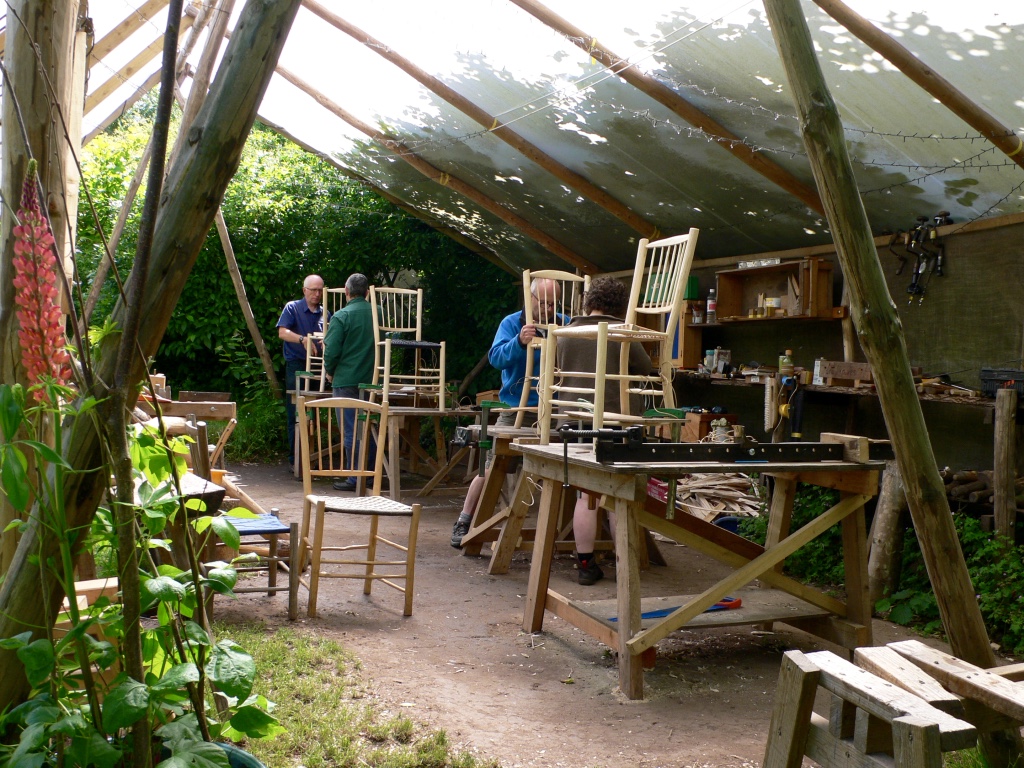
During the summer of 2020, I spent several sessions with a friend filming my current methods for making a spindle-back chair, which we hope to have edited by spring 2021. This inspired me to record the many changes to my chair-making techniques, as written and photographed in Going with the Grain, that have happened since the second edition was published.
So here are the updates, chapter by chapter below, interspersed with links to the specific topics, either as videos or blogs (just click on the text highlighted in colour). Where I refer to page numbers, these refer to the second edition.
Chapter 1 – Introduction
Chapter 2 -Why make cleft wood chairs?
Both these chapters still hold pretty much true.
Chapter 3 – Wood for chair-making
Ash die-back (page 17)

Since its appearance as I was writing the second edition in 2013, ash die-back has spread profusely throughout most of the UK. I have been fortunate to still be able to source good quality healthy logs locally but how long this will continue, who knows?
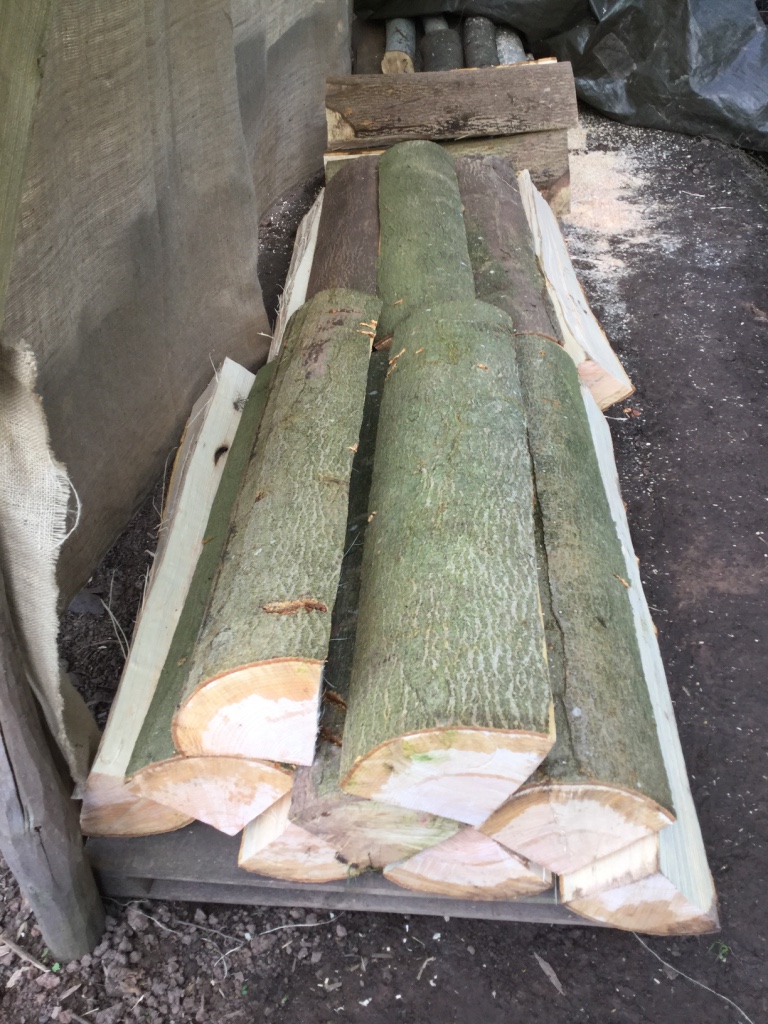
Selecting & storing green logs (page 19)
If and when you do obtain your green logs, I suggest you store them off the ground (e.g on pallets) shaded from the sun, protected from the rain then wrapped up well to avoid the wind blowing through.
Chapter 4 – Cleaving
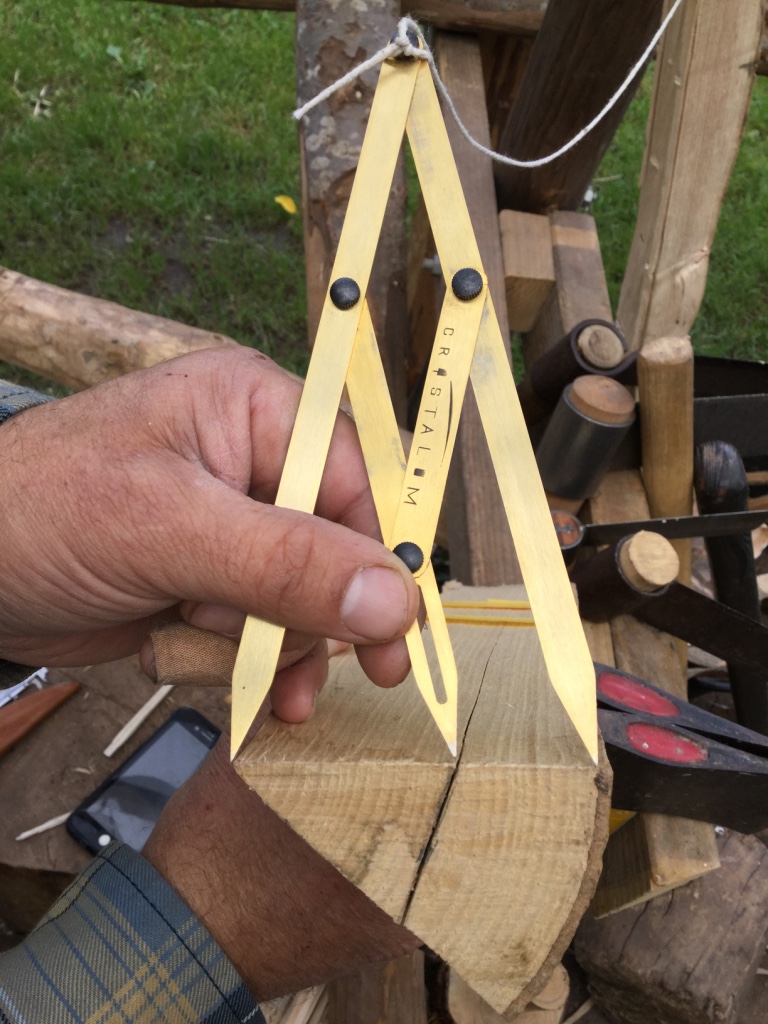
A Golden section gauge (page 26)
The section about using the Golden ratio when cleaving tangentially still applies but I have discovered that one can purchase a wonderful little gadget, or better still make your own, which makes it dead easy to mark it onto your piece of wood. Having used this for a couple of years, I now find it quite indispensable.
Chapter 5 – Shaping the components
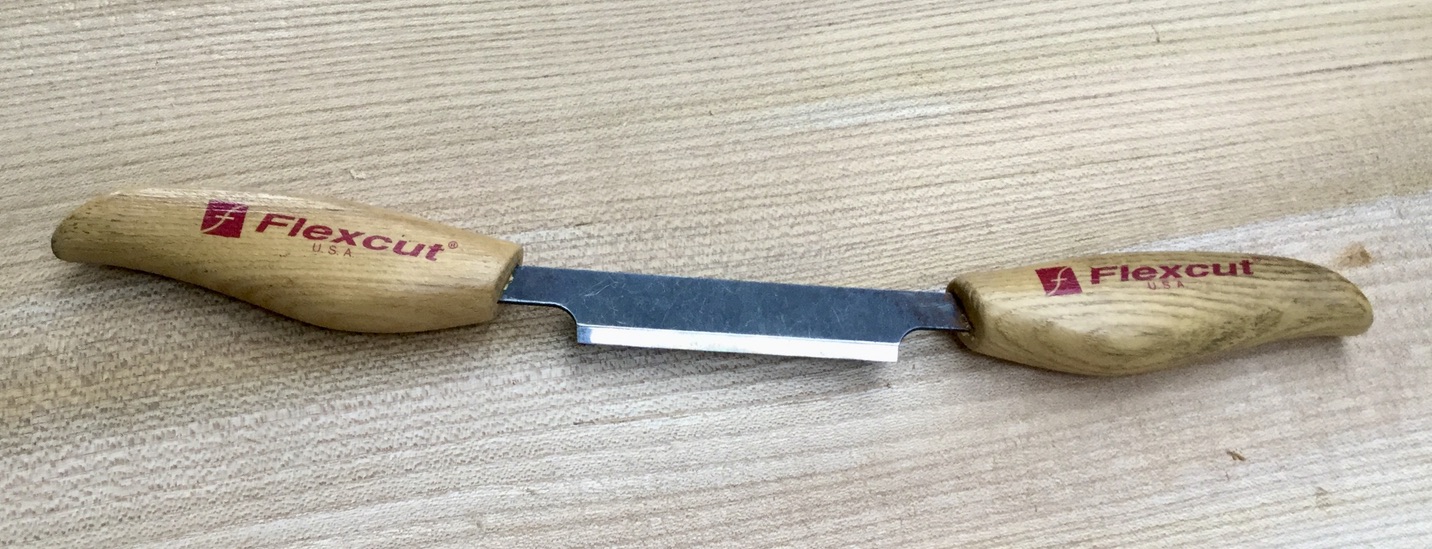
The ‘push-knife’ (pages 30 & 31)
I still advocate the process I call ‘sheaving’ where the tool is used to rip away fairly large chunks of wood rather than slicing away neat little shavings. When using this process for removing the shoulders on a rung or spindle, I now prefer to use a single-bevelled, Flexicut ‘push-knife’, rather than the Mora knife (although I do now use the double bevelled Mora knife for delicate cleaving).
Chapter 6 – Chair joints
Ensuring the wood is green before use (page 34)
I still get great delight from using the natural shrinkage of unseasoned wood to create the slightly oval joint illustrated on page 33. I usually obtain my wood in late winter or early spring, so despite storing it under cover in the shade, it will inevitably have started drying out by late summer.
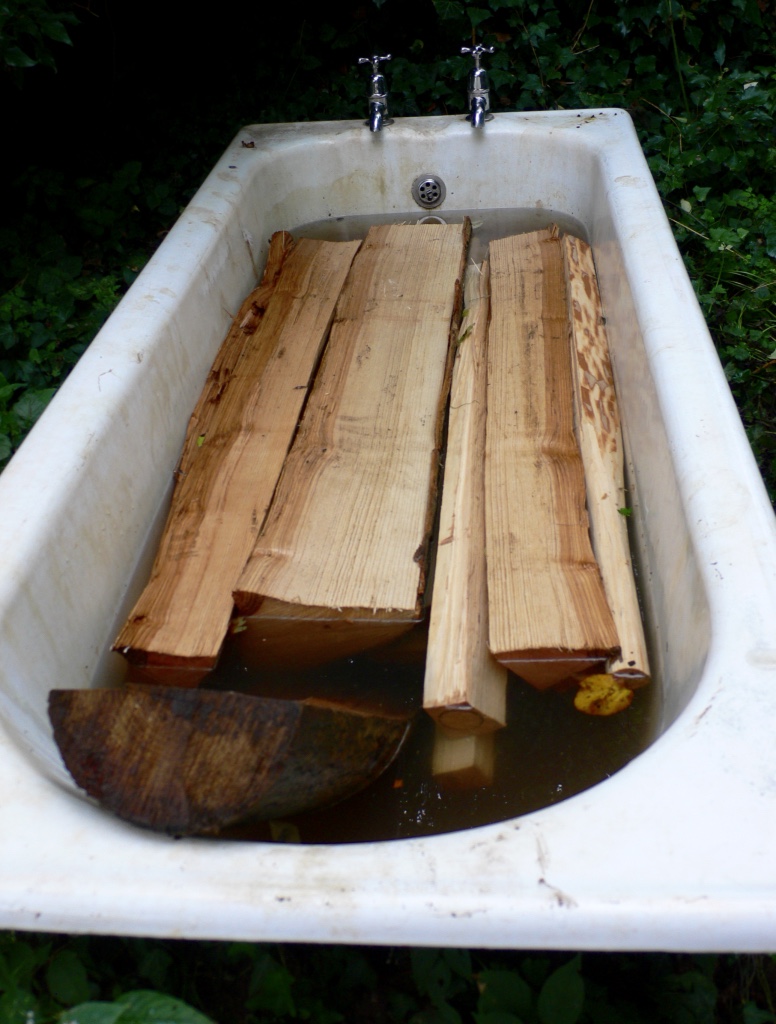
For the last few years I have placed the wood in a bath full of water for the logs to soak for at least 3 days before starting to work with it. If it has been cleft but not used, then it goes back into the bath until needed. If this wood is able to drink its fill of bath-water, its cells will swell to their original green condition, then any round tenons you produce will really shrink to a distinct oval when dried. If nothing else, it makes it so much easier to shave off the bark!
Drying the shaped components (page 35)
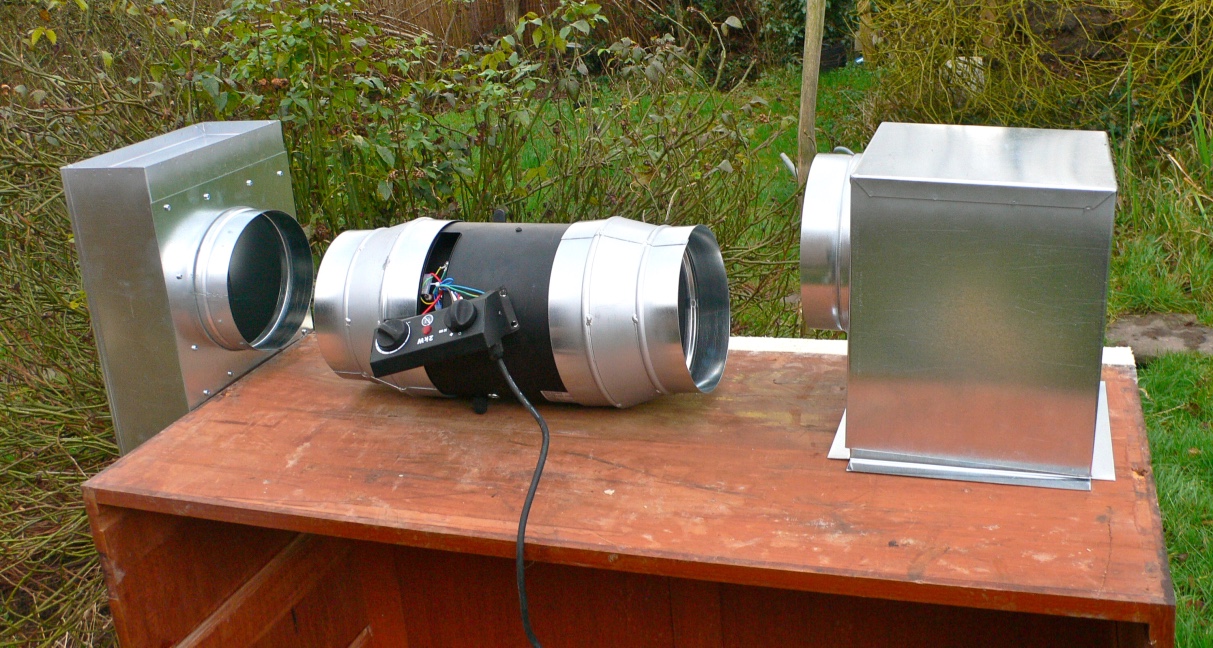
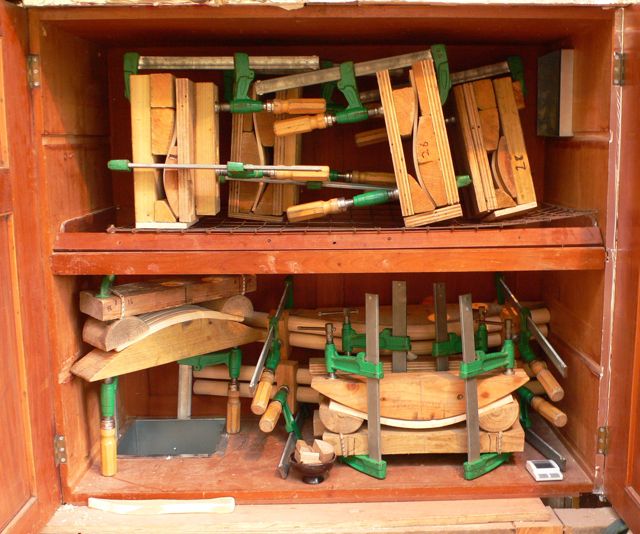
When I had my woodland workshop, I made use of a wonderful wood-fired arrangement of cooker and two drying boxes, while at home I made a set of racks in the inglenook above the wood-burning stove (see pages 34 & 35). When I started running courses at home, my friend John kindly built a drying kiln in my workshop, making use of an inherited cupboard, which was the ideal shape and size. He sawed out an inlet and outlet and fitted a 2kw fan-heater beneath the bench connected by the requisite ducting. I suppose sooner or later the heater will need replacing but it has functioned perfectly now for five years keeping a fairly constant 45 degrees (when in use), enabling us to dry rungs and rails within 24 hours, although an extra 12 hours or so is preferable.
Drilling the mortices (pages 38 & 39)
On these two pages I gave a fairly detailed account of all my explorations with a range of drills. Several years ago adopted a two stage approach using a cordless drill to make a pilot hole, followed by a brace-and-bit for the main mortice. This approach is illustrated in Chapters 16 & 17. Since then I have introduced the use of a Forstner bit for the final stage. This sequence is described as follows:
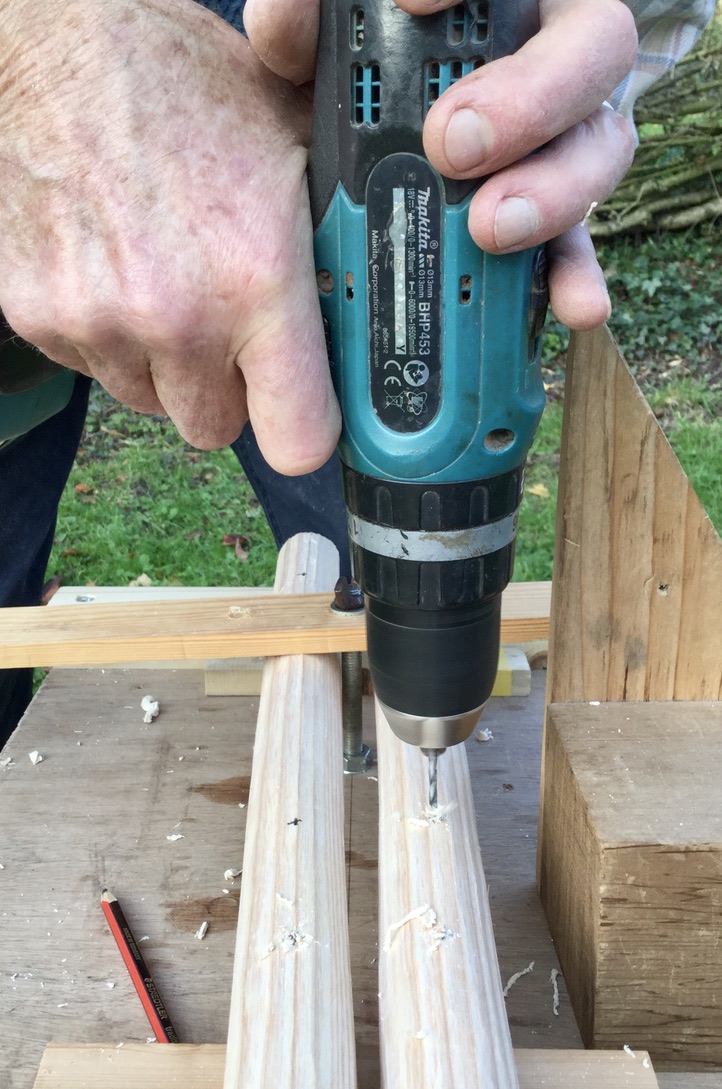
Having marked the position of the mortice, I start by drilling a pilot hole with a 3 or 4mm lip-and-spur bit in a cordless drill, going about 10mm into the wood – no need for any kind of depth marker for this hole.

Once the pilot holes have been drilled, I then follow with an auger bit held in a hand brace. I found that marking the depth with paint didn’t last as long as using a strip of tape, especially if it is placed a few millimetres further back than the depth of the hole. Just to make sure, I also count the number of turns, so with this particular 14mm bit, I stop after about 16 turns from when the cutter first bites. (OK, so this is not perfectly vertical but the flexibility in the components allows for a little inaccuracy!)
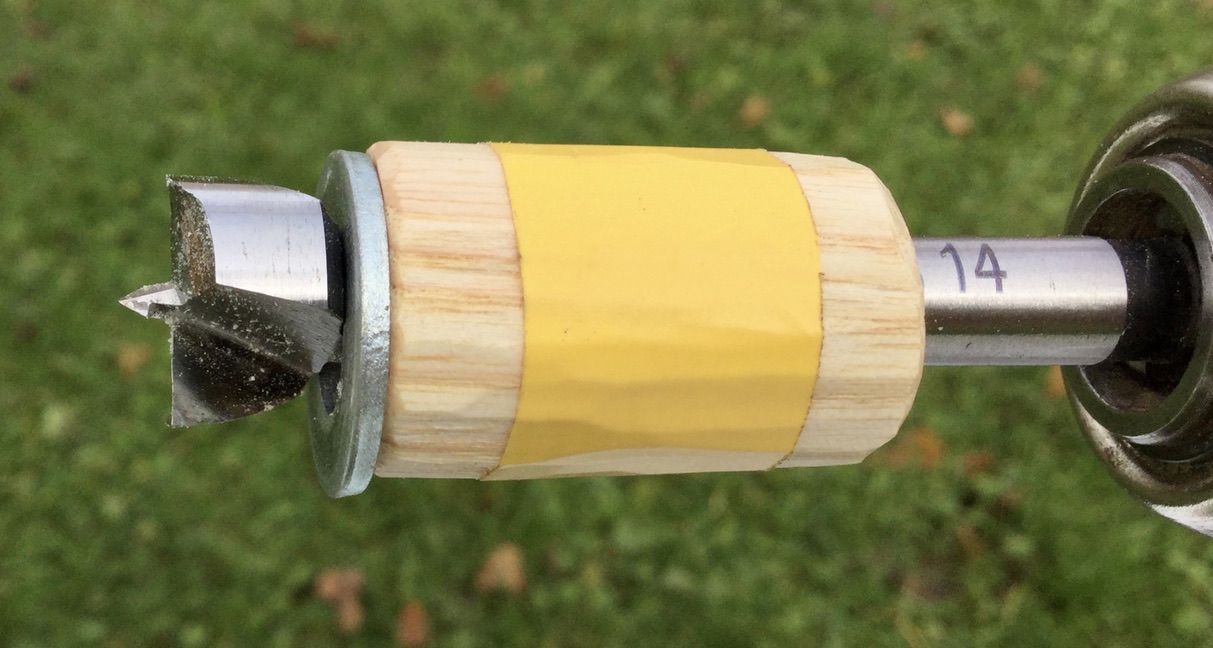
So as to avoid the likelihood of the tip of the auger bit popping right through the leg, I now drill the final few millimetres of each mortice with a Forstner bit held in a cordless drill used at full speed. It can be a bit fiddly fitting it into the hole but don’t start drilling until it is well in the hole and don’t push on it until it is at full revs. To regulate the depth, I have fitted a length of wood with a 9mm hole drilled through it, as well as a metal washer to reduce any burning caused by the two surfaces rubbing.
When I am making chairs in my indoor workshop, I sometimes use the Forstner bit held in a mains-powered drill to do the whole operation but this is a bit scary for the beginner. I am working on making all the drilling vertical, which might enable anybody so inclined, to create some jigs so that the hand drill could be replaced by a fixed drill press. To my mind this would be more trouble than it is worth!
Chapter 7 – Some more useful tools
Strangely enough, I can’t think of any relevant manufactured tools that have come my way since 2013 apart from the Flexicut ‘push-knife’ mentioned above.
Chapter 8 – Making a shaving horse
The skew sections of the seat, that occurred to me while writing the book, shown in photos 6 & 7, page 53 (although the photos revert to the older version thereafter!) are immensely useful when cleaving smaller components like rungs, seat-rails and spindles. It is a good idea to countersink the heads of the turbo coach screws but otherwise nothing has changed on this project. Even if you have my book in front of you, this excellent video by Johnny Walshe will be well worth watching.
Chapter 9 – Making a club and a pin

The club pictured on page 57 has a slightly awkward lump, so here’s a photo of a very similar club, which I made this summer with a similar lump, which I chopped off with a sharp axe. Otherwise nothing new in this chapter.
Chapter 10 – Making a chair-maker’s bench
As I describe on page 63 I have spent most of my career developing various designs to achieve the ideal chair-maker’s bench, a process which has continued right up to now (November 2020). The bench described in detail on pages 64 to 71 still sits at the heart of my outdoor workshop with with a number of ‘tweaks’ described below.
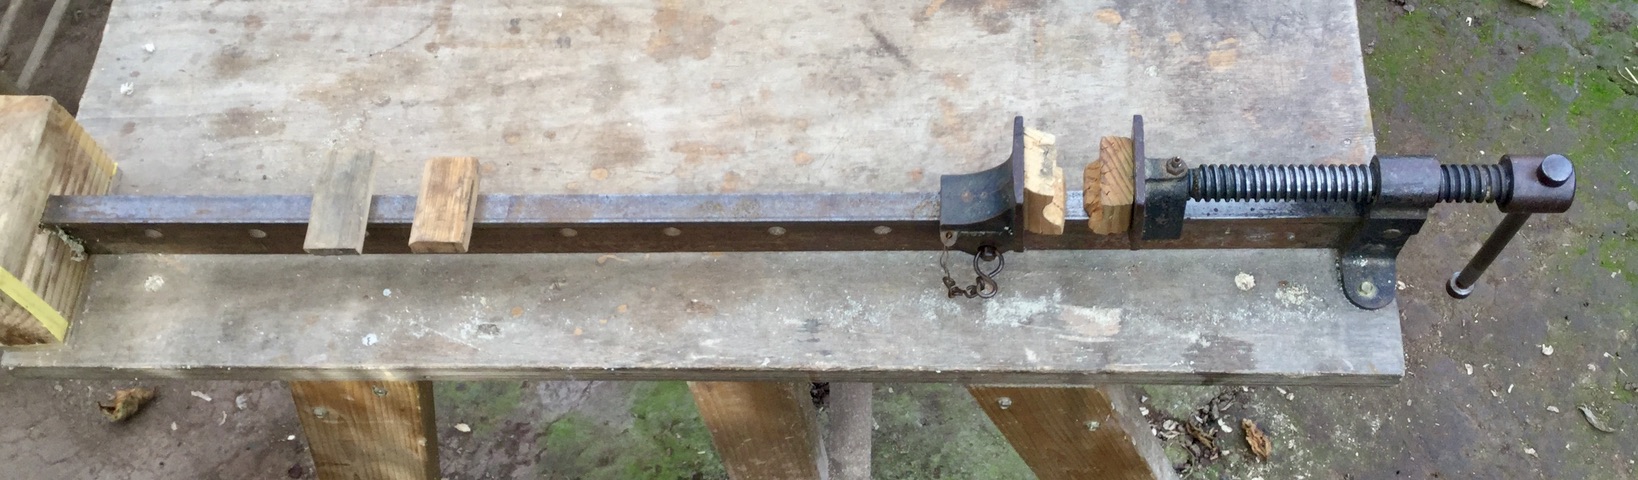
A larger clamp (page 64)
The sash clamp pictured in this chapter was widely available for about £25 and is suitable for all the projects in this book. On page 64 I described a hypothetical chair-makers clamp, mentioning Leo’s prototype pictured on page 12. Sadly this clamp, based around a car jack, only worked for a couple of years before the jack mechanism collapsed under heavy use. Since then I have reverted to the old Rededa sash clamp that I bought for £25 in 1985 and is still going strong! You can see that I have fixed it nearer to the end of the bench (10cm or 4″) to enable the lever system for bending the back legs.
The elliptical holes (pages 65 & 66)
The two elliptical holes in the bench make for an interesting geometric project but over time, I have found that they can be a bit of a nuisance. On one bench I have filled one of the holes by fixing the cut-out section back in place with a couple of battens screwed to the underside of the bench. On another of these benches, I have fixed these battens but left the off-cut loose, so it can be lifted in and out as required. You can see this in the photo of the assembly bench below.
Cutting list error (page 69)
In the cutting list on this page, the Imperial measurement for the length of the top horizontal should be 40 inches rather than 48.
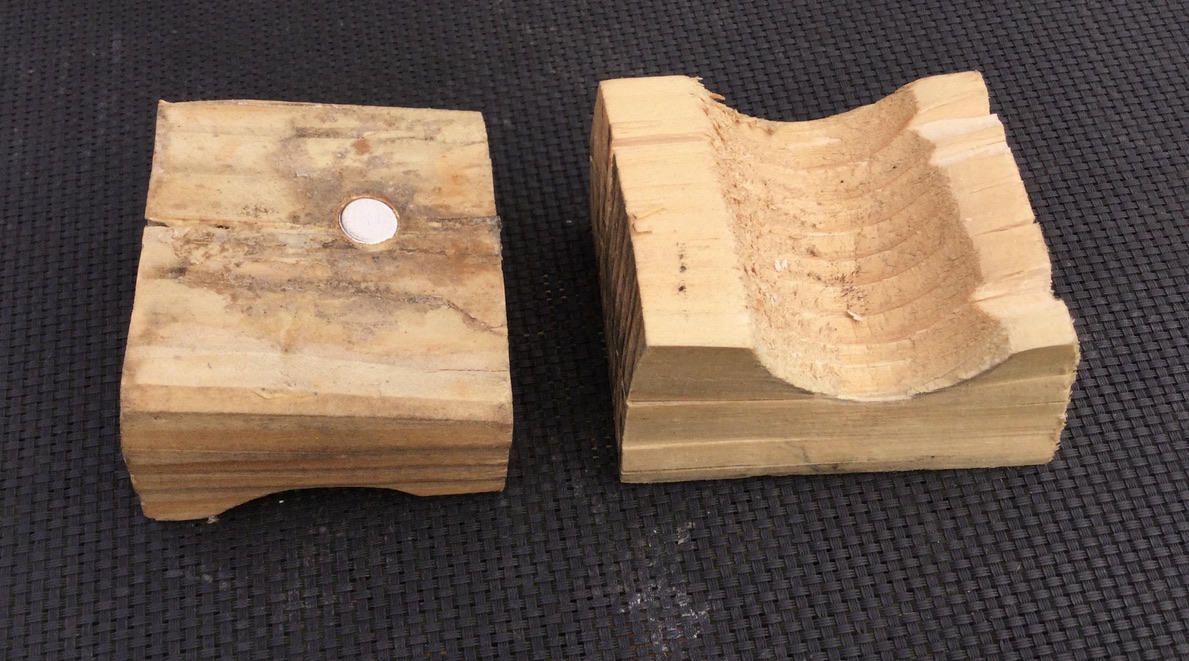
Magnetic gripping blocks (pages 71 & 72)
In the book I used some tape to fix a couple of softwood blocks to the jaws of the clamp. In the picture of the Rededa clamp above, you should be able to discern a couple of odd-looking wooden blocks attached to the jaws. These are pieces of softwood formed by cutting down one of the ‘bridges’ pictured on page 72 of the book, as pictured in more detail here. In the centre of each block is the shape formed by a 40mm drill but the ‘jaws’ have been shaved back, so they don’t interfere too much during the squeezing process.
The yellow tape holding the simple softwood blocks (as pictured in the book on page 71, step 9) was initially replaced by using velcro pads glued to the blocks and to the jaws of the sash-clamps. It seemed a good idea at first but the adhesive tended to slip when under duress, so my friend John (of drying cabinet fame) came up with the brilliant idea of gluing an 8mm rare-earth magnet into the back of the block. This grips the block very firmly to the jaws of the clamp, while enabling the block to be re-positioned or removed all together. The photo of the Redena clamp also shows a couple of plain gripping blocks being held by magnets onto the clamp, ready for use when needed.
Extra weight
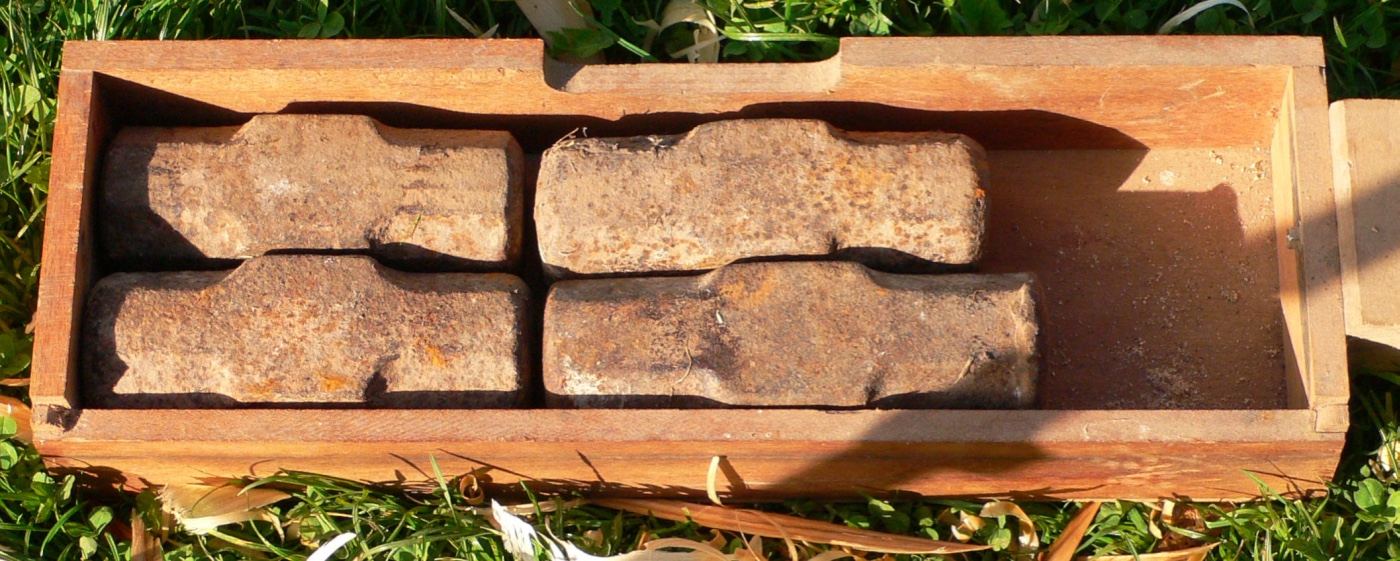

When using the bench as the base for bending the back legs of a chair (pictured on pages 101, 103 & 119) there can be a tendency for the end of the bench to tilt up in the air, although if an assistant was around, they could lean onto the end of the bench to keep it on the ground. I remembered that I had been collecting some sledge-hammer heads, so I fitted them into a wooden box, which I then screwed onto the leg of the bench, and that holds the whole thing nice and solid now. Of course you could use any similar heavy object(s).
The assembly bench
The chair-maker’s bench described in the book along with the minor tweaks described above, has served very well for steam-bending and for squeezing the chair together. When it comes to drilling the mortices before assembly, I found this bench rather too high and large to be ideal. For the last couple of years, I have added a couple of smaller benches (about 100cm x 60cm and 70cm high) used specifically for this purpose, making it much easier to reach the whole surface of the bench.
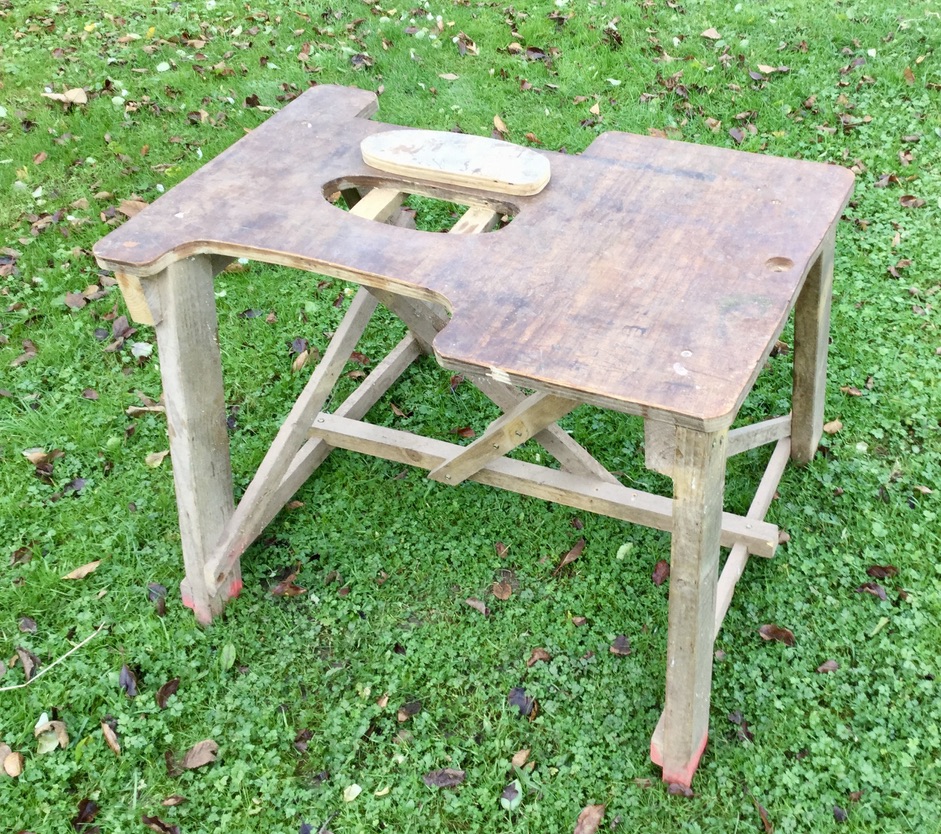
It really helps if the bench is as horizontal as possible, so on my slightly sloping floor (to avoid flooding during a deluge!) I had to insert blocks and wedges to get them level. I then realised that this defeated to object of having only 3 legs (so it didn’t wobble on the uneven floor) so I rebuilt them with four legs, which reduced the chance of them tipping up while drilling.
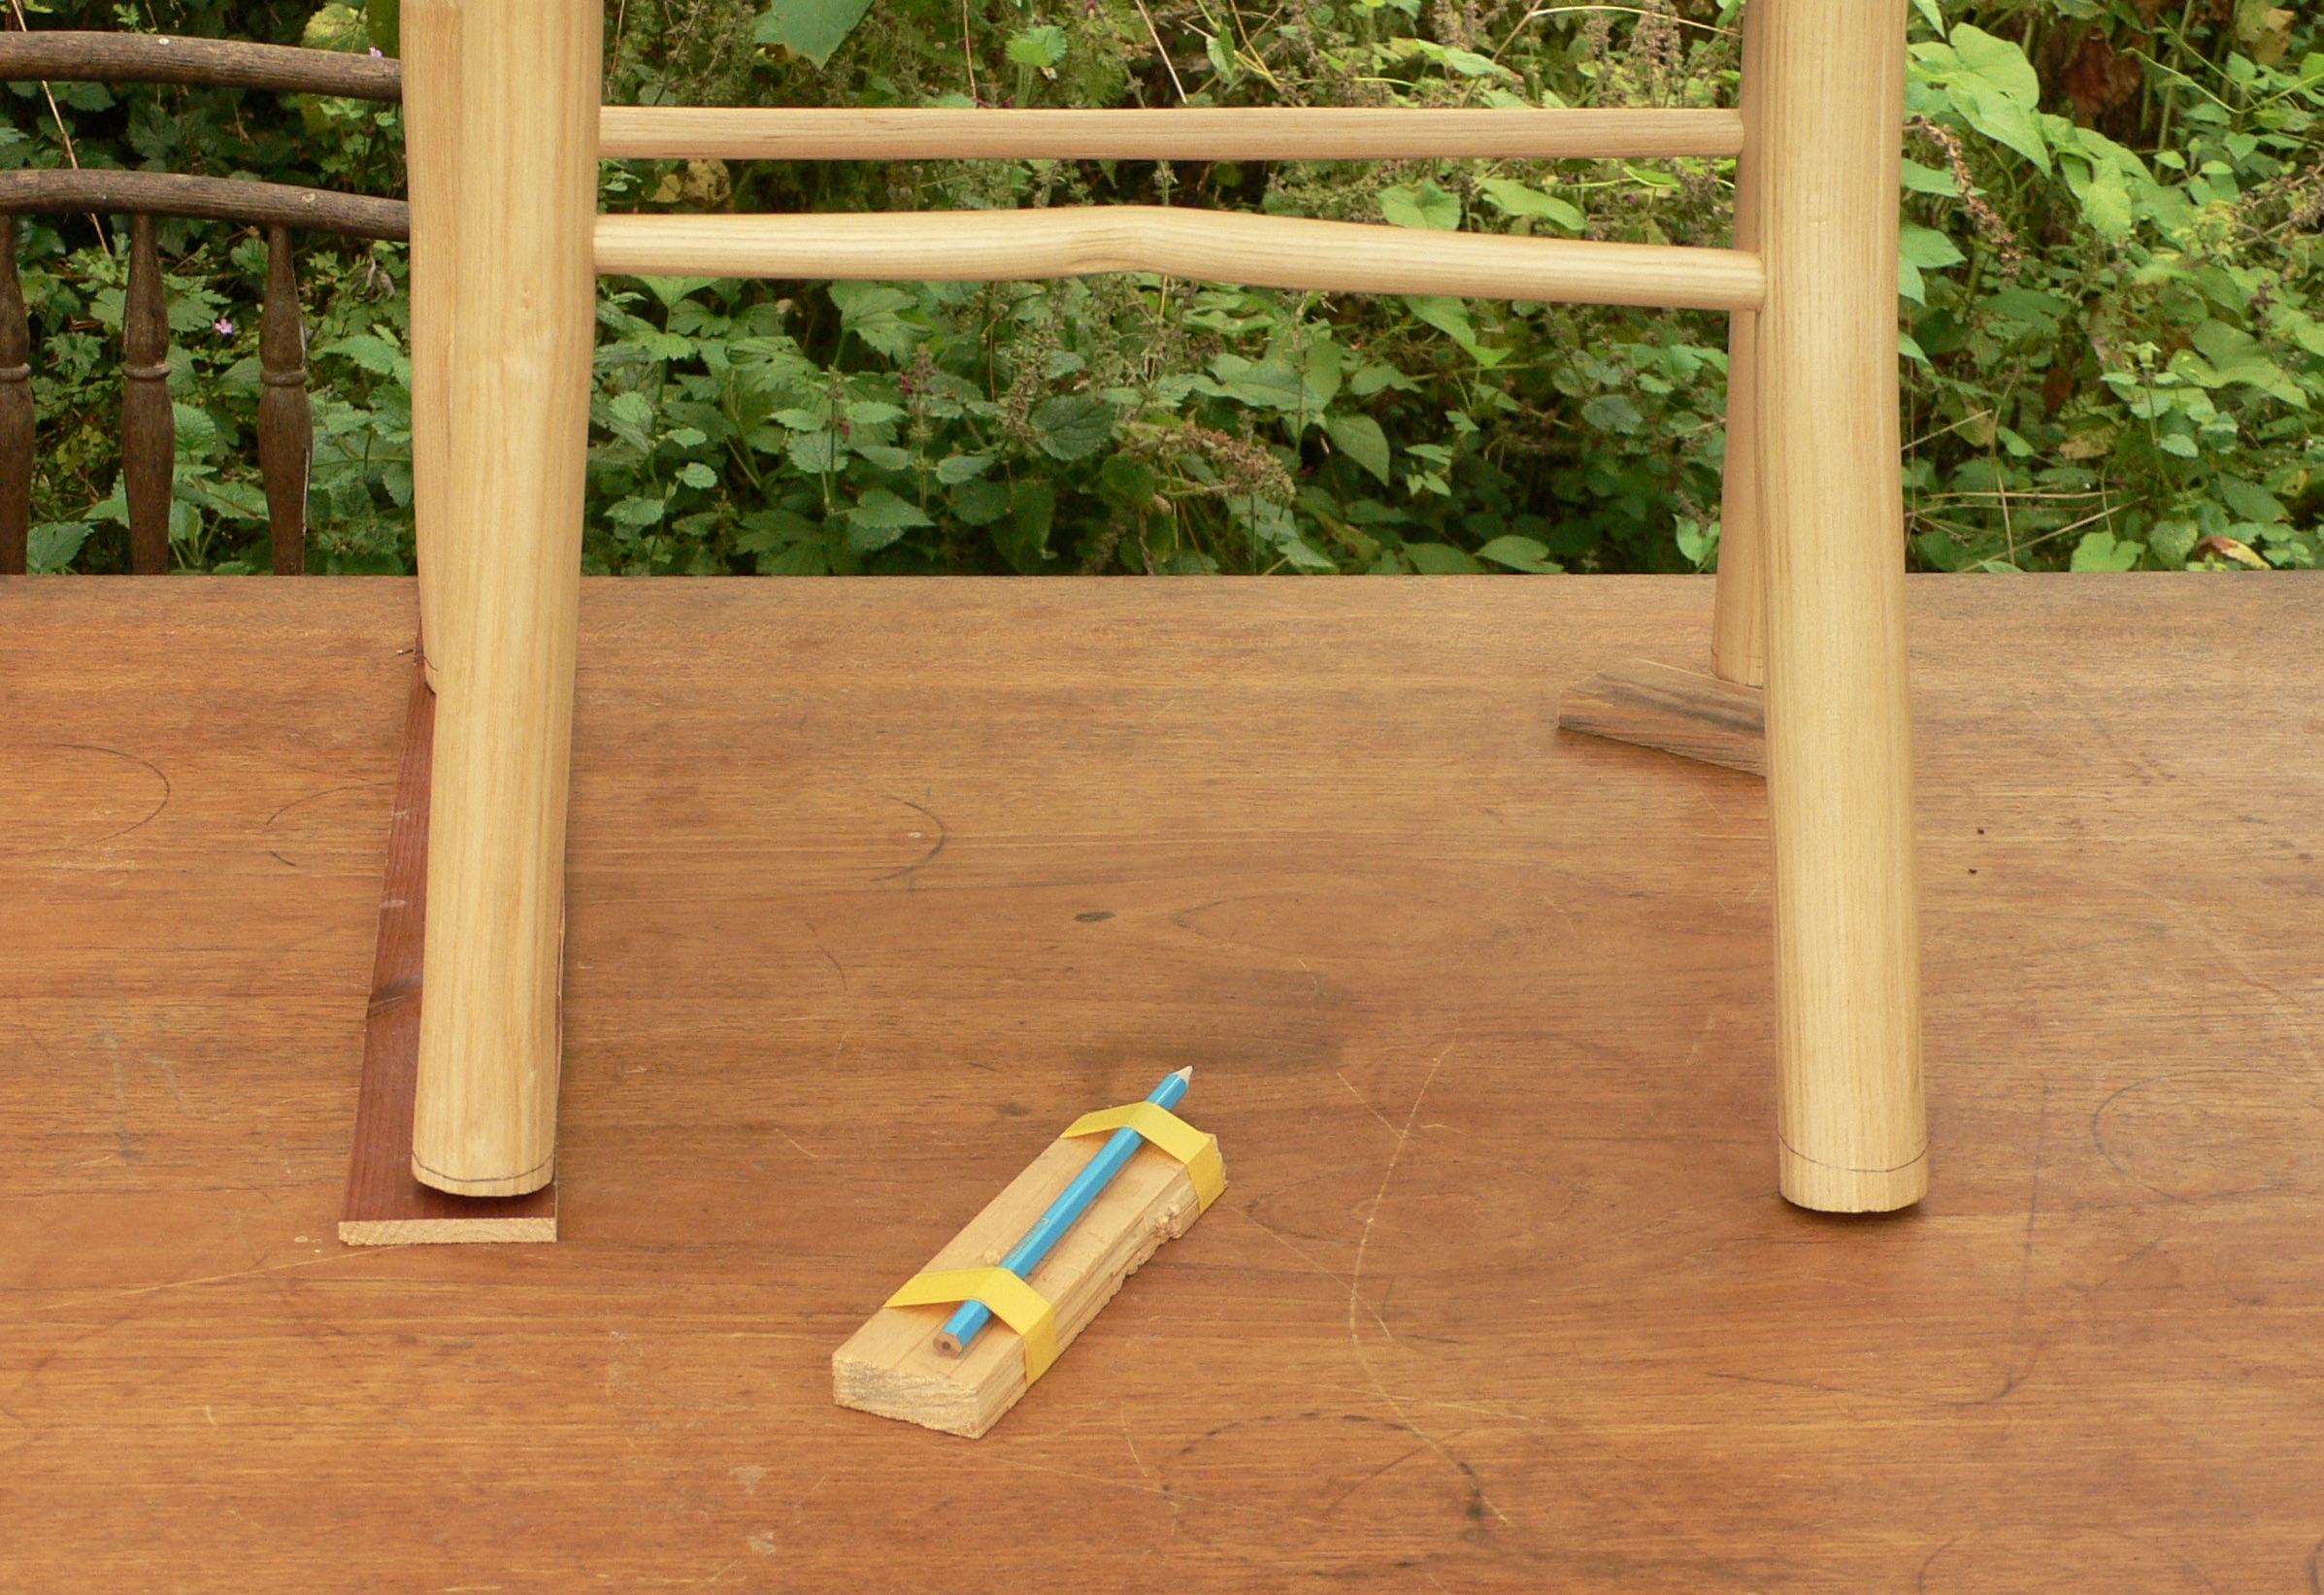
A depth gauge or ‘The hole’ (page 72)
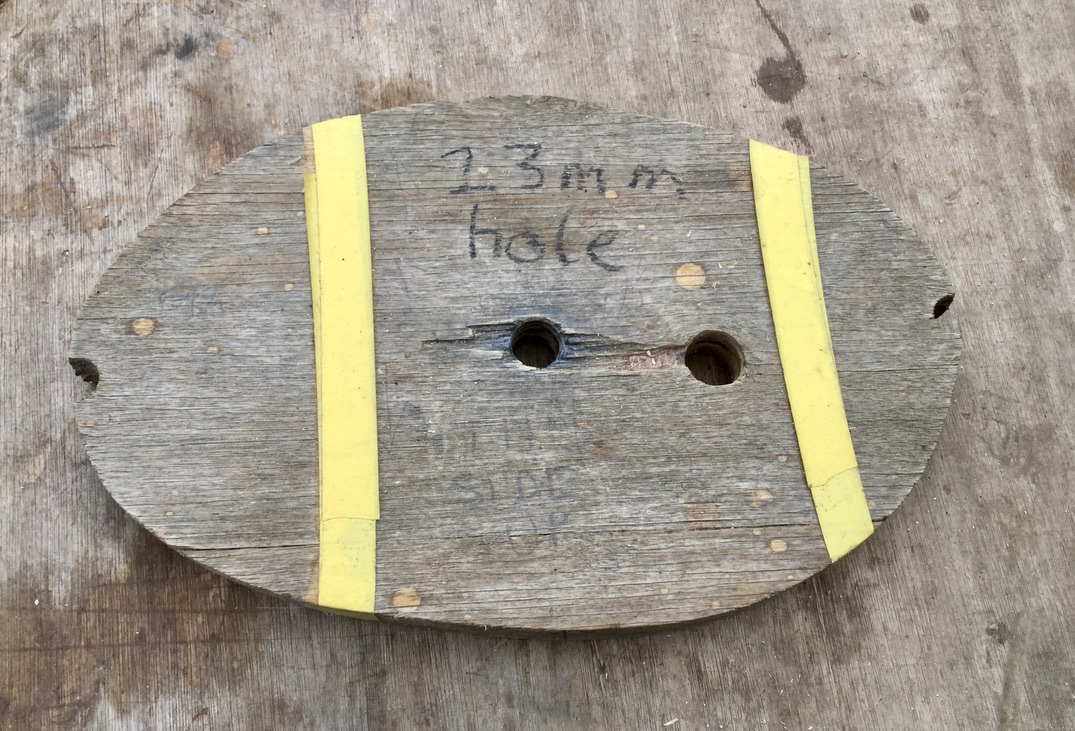
A modification on the depth gauge makes use of one of the 25mm thick elliptical off-cuts from making the bench. Because it is heavier than the little block described, it can be used without the need to grip it in a clamp. We now make use of the serendipitous tear-outs around the hole, where the pencil can mark a circle nearer 23mm from the end of the rung. This means that the pencil mark should disappear fully into the mortice reducing any need to clean it up after assembly.
Chapter 11 – Making the Basic Components
Gripping the rungs in a clamp for tenoning (page 78)
If you have a reasonable bench with a clamp or a vice, I suggest it preferable to using the shaving horse when cutting tenons, as you are probably more likely to keep the bench level than the shaving horse. Place a length of wood on the bench that is the same height as the base of the clamp, then sit the rung on both these and grip it with the jaws of the clamp. Check that this is horizontal before using the spirit level in the tenon cutter to shape the tenon.
Making back legs (page 84)
I must have been desperate for decent wood to have used that log as a starting point for a pair of back legs! I would always recommend finding a log if possible, that will yield something approaching the desired diameter by cleaving it in half, quarter, eighth or even sixteenth. Cleaving a metre-long log is most likely to run straight if your radial splits are in half. Still, on this occasion I was fortunate to get away with cleaving it into thirds but I think I was just showing off!
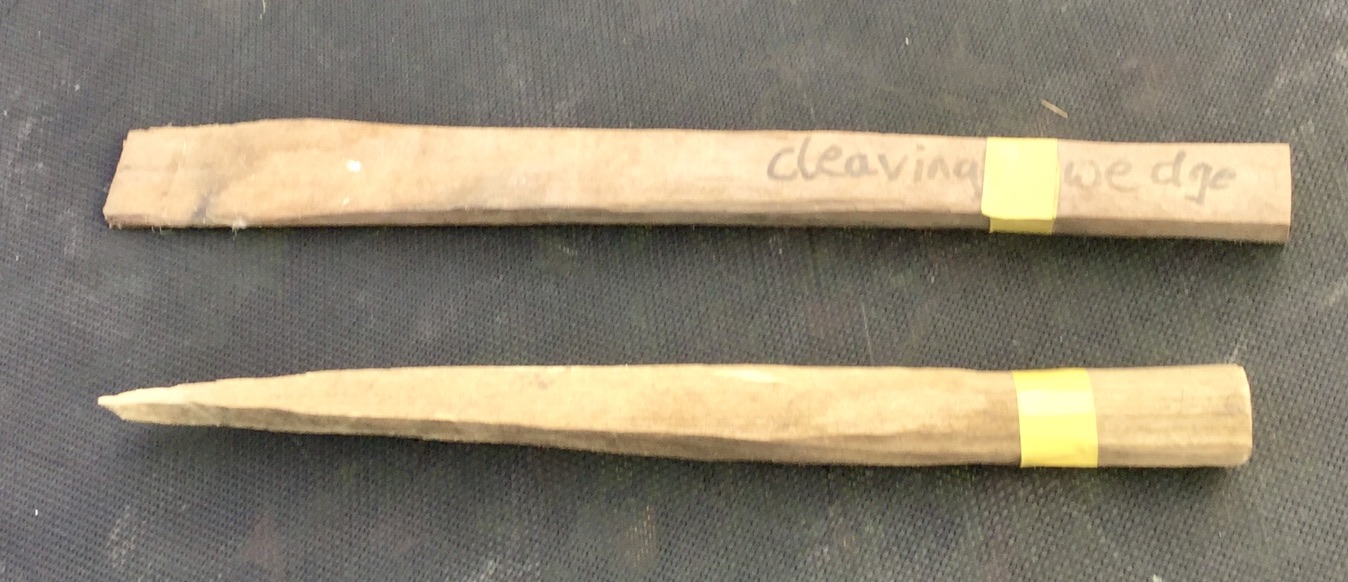
A cleaving wedge (page 84)
In step 3, I pointed out that I was using a hazel stick to help keep the split open. Nowadays I have a number of tapered ‘cleaving wedges’ to hand for the purpose of holding the split open. Using your hand for this purpose could prove to be rather painful.
Engineer’s black (page 85)
I was shown the technique shown in step 9 on pages 84 & 85 by an engineer, who described the use of ‘engineers blue’ to mark the high points of a surface to be levelled. In the woods we always had plenty of charcoal for such a purpose but nowadays I use coloured wax crayons to run around the inside surface of the ‘curtain ring’. It helps if this surface has been roughened with something like sand-paper.
Chapter 12 – Making a foot stool
Chapter 13 – Making a tall stool
Because my courses concentrate on making chairs, very little has progressed in the realm of stools.
Drilling the mortices
However, it is worth stressing the that by using the three three drills in sequence as described earlier, you should avoid the need to shave away any wood torn away in the drilling process (pages 88, 96 & 99), although there will probably still be some pencil or other marks that will need cleaning up.
Assembling
It really is much less stressful if you can make use of a sash clamp to squeeze it all together!
Trimming the bottom of the legs
I shall describe an improved method, when I get to updates for Chapter 16
Chapter 14 – Steam-bending
Wee-wor rockers (page 101)
Although this doesn’t come under steam-bending, this page contains an illustration of the curve on the bottom of the rockers for the wee-wor chair (Chapter 18). I have now changed my templates by using a radius of 150cm or 60″ rather than 120cm or 48″.
The current steam box (pages 105 to 107)
Since I moved my courses back home from the woods, I have continued to use my trusty old wallpaper stripper to generate the steam. However, in order to deal with four chairs at the same time, I needed something larger than the plastic tube pictured on page 106. Not being one to throw things away, I now use the heavy plywood box from the woods, wrapped up in the remains of the Kingspan foam box plus some hessian. The wallpaper stripper steam-generator stands on a ledge connected to an electric socket in the workshop while a pipe takes steam to the steam box. (You might be pleased to see that I have repaired the broken glass and painted the door of my workshop as pictured on page 106!)
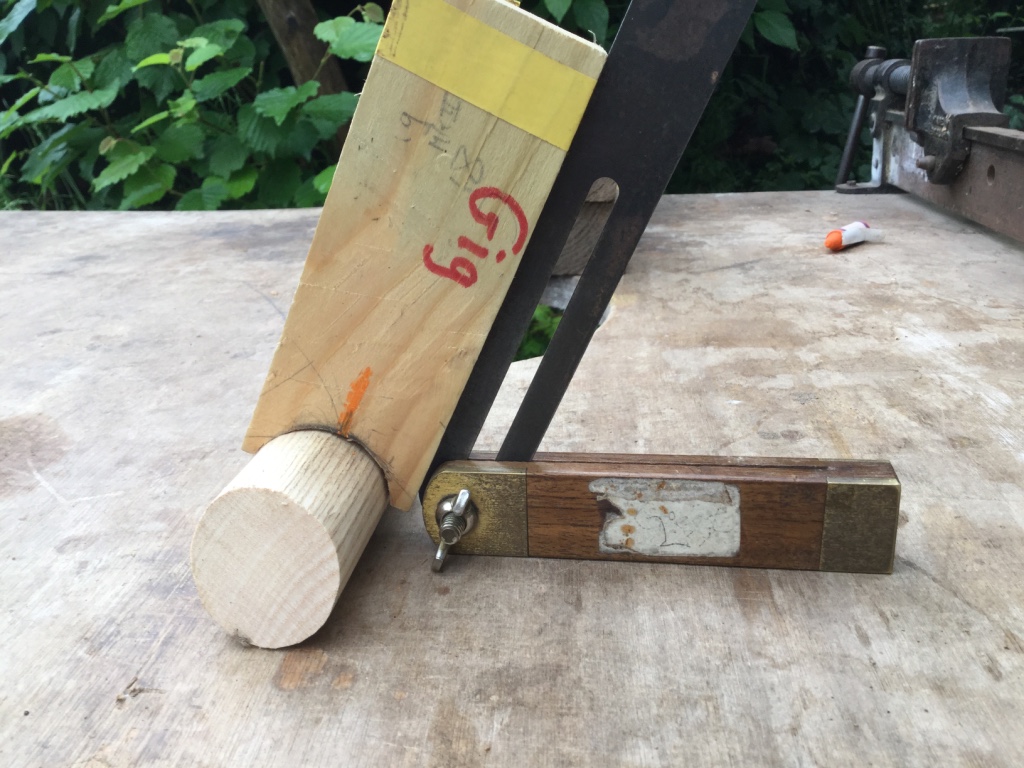
A centre-finder (pages 108 to 110)
You can see in the book what a fiddly job it was to make an accurate ‘centre-finder’. It is much easier to make ‘Geoff’s Jig’, as suggested by regular course customer, Geoff a few years ago. This is simply a length of 2″ x 1″ (50 x25mm) batten with a 40mm (1 1/2″) hole drilled at one end, which is then sawn off. A mark at the appropriate position can then be used to locate exactly where you need to drill an angled mortice.
Chapter 15 – Making parts for a spindle-back chair
New dimensions (page 111)
Although they are all fairly minor changes, they do make a significant difference to the outcome of the chair. These lengths are obviously in centimetres but if you really want it in inches, then I’m sure you can work something out! I hope this formatting works on your system.
| 1st edition | 2nd edition | 2020 update | |
| 2 Front legs | 50 | 50 | 55 |
| 2 Back legs | 90 | 93 | 95 |
| 2 Front rungs | 46 | 45 | 45 |
| 1 Back rung | 35 | 35 | 35 |
| 2 Side, bottom rungs | 37 | 37.5 | 38 |
| 2 Side, centre rungs | 35 | 35 | 35 |
| 1 Front seat-rail | 46 | 45 | 45 |
| 3 Side & back seat-rails | 35 | 35 | 35 |
| 1 Cross-rail | 36.5 | 36.5 | 37.5 |
| 1 Crest | 42 | 42 | 43 |
| 5 Spindles | 30 | 30 | 30 |
Details of the changes
- The consensus was that the seat in the 1st edition needed raising a little
- The longer legs also enable a bit more spare when levelling the bottoms of the legs
- The slightly shorter front enabled easier maths for weaving patterns
- The improved bending system meant more curve in the back legs, resulting in longer bottom rungs and a longer crest with a correspondingly longer cross-rail
If you are following the detailed instructions in the book, then remember to incorporate the above changes as you go along.
Spindle tenons (page 114)
I nowadays really suggest waiting until the spindles are dry before using a 5/16′ mini tenon cutter to get them to size. If you really want to remove any doubt when shaving the spindles to size, you could use a 3/8″ mini tenon cutter to size the tenons, while they are green. Then when they are dry, the 5/16″ cutter will just remove the final fraction of a millimetre before fitting them into nice and snugly into an 8mm (5/16″) hole.
Chapter 16 – Assembling the spindle-back chair
The assembly process (page 121)
For the last 20 years or so until the summer of 2020, my assembly process for a spindle-back chair was as described on this page:
- Assemble both side panels
- Assemble the spindle frame
- Assemble these three frames with all the remaining rungs and seat-rails
During the Covid 19 lock-down I took the opportunity to rethink the whole assembly process, which resulted in a return to the more common approach of assembling the front and back panels individually, then joining them (as described in my first book, Green Woodwork and in many other chair-making books). On a separate website page over the coming weeks, I shall attempt to describe this ‘Post Covid’ approach, as used by the old master chair-maker, Philip Clissett – all very PC!
However, I shall continue the updates on this webpage continuing with the process as described in Going with the Grain but incorporating the relevant updates described on this web-page.
Seat height (page 121)
I wrote in the bullet points on this page in the book, that a comfortable chair height was generally regarded as 45cm or 18″. In fact 18″ is much nearer 46cm and I see from various websites that the recommended metric height spans the range 45 to 50 cm. I now suggest making the seat 48cm above the floor so that after trying out the chair with its woven seat, you can reduce it by up to an inch or so (a couple of centimetres) if necessary.
Always on the lookout for ‘tidy’ numbers, I have replaced the spacing of 11, 28 & 45 cm by 12, 30 & 48 cm, which translates near enough as 5, 12 & 19 inches. This comes into play when following the instructions on page 122.
Magnets again!
On page 123, you can see a range of softwood blocks used to grip the legs in place. You will find a magnet sunk into one face of each of these blocks will be a noticeable help.
Setting the angle (page 122)
This is where ‘Geoff’s jig’ described earlier will be a big help
Squeezing a frame together
Here’s a link to the YouTube video The Final Squeeze
Drilling the side panels (pages 128 & 129)
I hope that Step 1 makes sense to you. If your crest is now 43cm rather than the 42cm in the book, you could get by quite happily by gripping the side panel to the bench with the 5cm block as shown in Photo 5, and the top of the leg resting on the bench.
In Step 2 to take account of the higher seat and longer legs described earlier, I now suggest measuring down by 24cm and 30cm from the ‘datum point’ at the front and 24cm at the back.
Final assembly (page 130 & 131)
The video link above might help your confidence with this exciting operation. When squeezing the curved components into place (the crest and cross-rail) you might like to reduce their diameter a little to reduce the worry of things getting broken. This can be done by a bit of gentle whittling with a knife or by using a 9/16″ mini tenon cutter on the four tenons involved. 9/16″ equals 14.3mm, so they would still be tight in their holes but not as ultra-tight as the rungs and rails. To be really sure the chair holds together you could fit a couple of pins as shown on page 142.
Trimming the legs (page 132)
Once you have woven your seat, place the chair on a level area on the ground and check how it feels for height and lean forward/backward (get somebody to stick wedges under various legs, then place planks of various thickness under your feet until it all feels good). This should give you a rough idea of how much to remove from the bottom of which legs.
Place the chair on a level bench and apply this very handy tip passed on to me by Trish & Suzie in 2016. Again place various slivers of wood and/or wedges under each leg so that it is vertical from side-to-side and leaning back just right, without any wobble. Tape a pencil to a piece of wood and draw round each leg, so that when you saw along these marks, it will have just the right height and lean.

You could then run around the edge of these cuts with a knife or chisel to smooth off any whiskers left after sawing, as illustrated on page 94.
Chapter 17 – Making a lath-back chair
Modified dimensions (page 133)
I suggest that you apply the same modifications to the lengths of the components as detailed for the spindle-back above.
Fitting the pins (pages 142 & 143)

Here’s a handy little device made by my friend David to speed up the process of chiseling each pin to the right size. (I prefer not to use my very best chisel for this job!)
Nowadays I like to use walnut for these pins, as I happen to have some pieces left-over from another job. The dark colour of this wood contrasts well with the light coloured ash.
Chapter 18 – Making a wee-wor chair
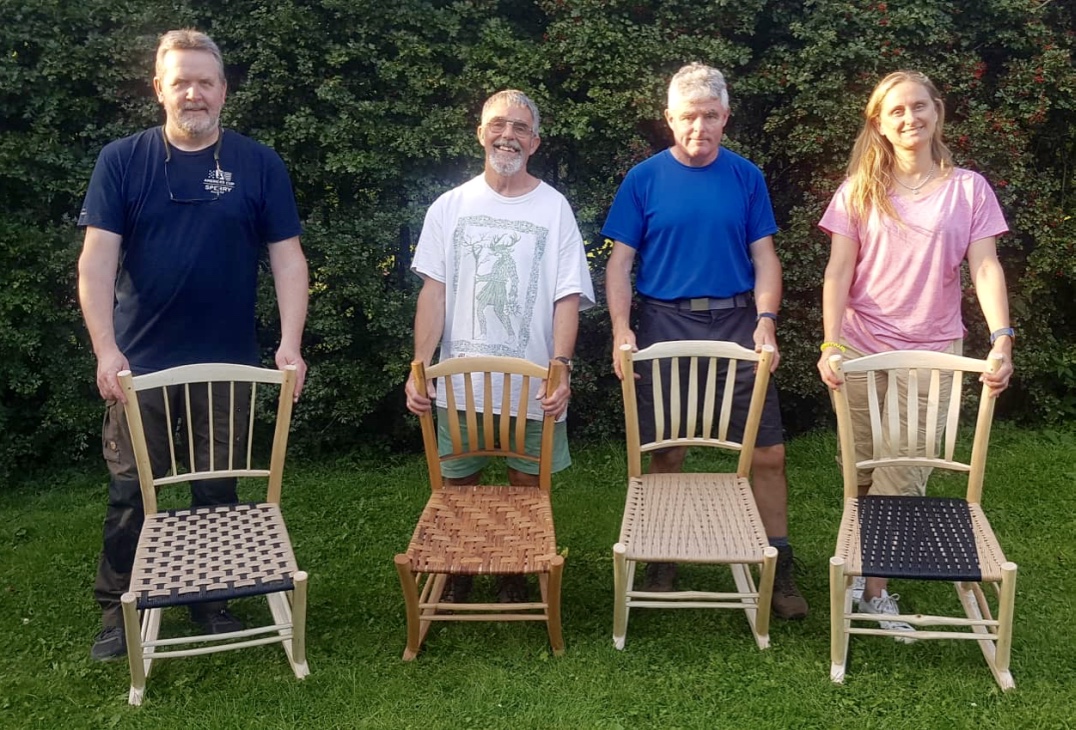
Everything in this chapter works as well as it did in 2011. However over the intervening ten years, its design has evolved considerably, thanks in no small way to regular customer, Hannah. Here’s a photo of four versions of its latest incarnation. I hope one day to describe the details of the current process – but not at the moment I’m afraid!
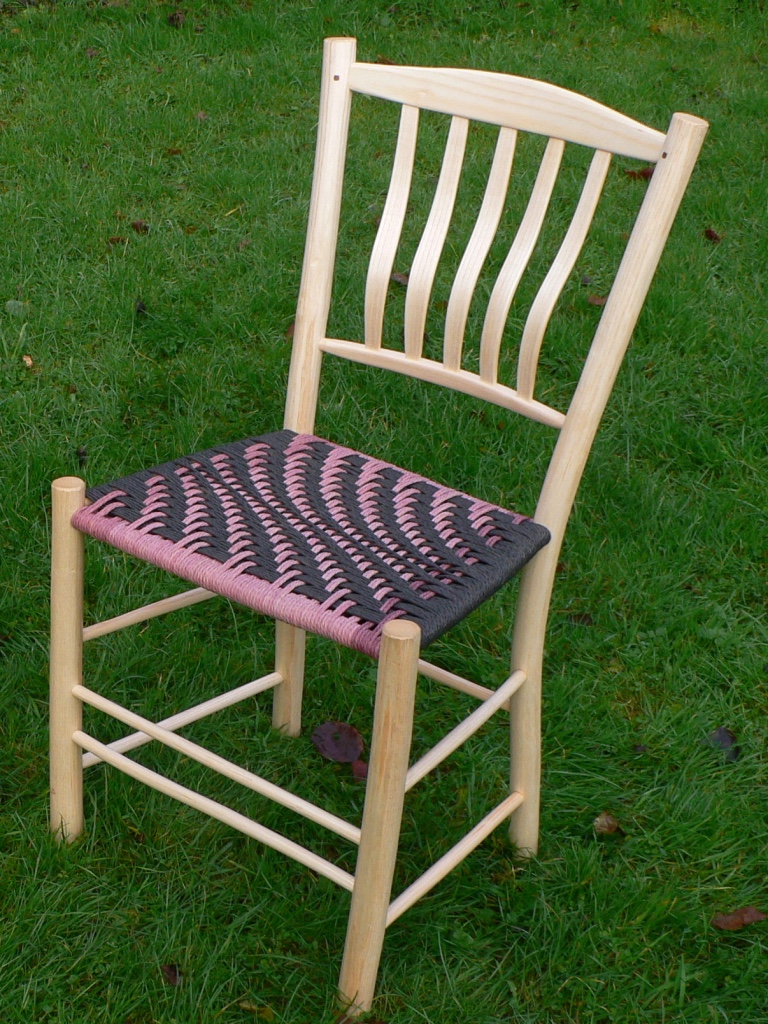
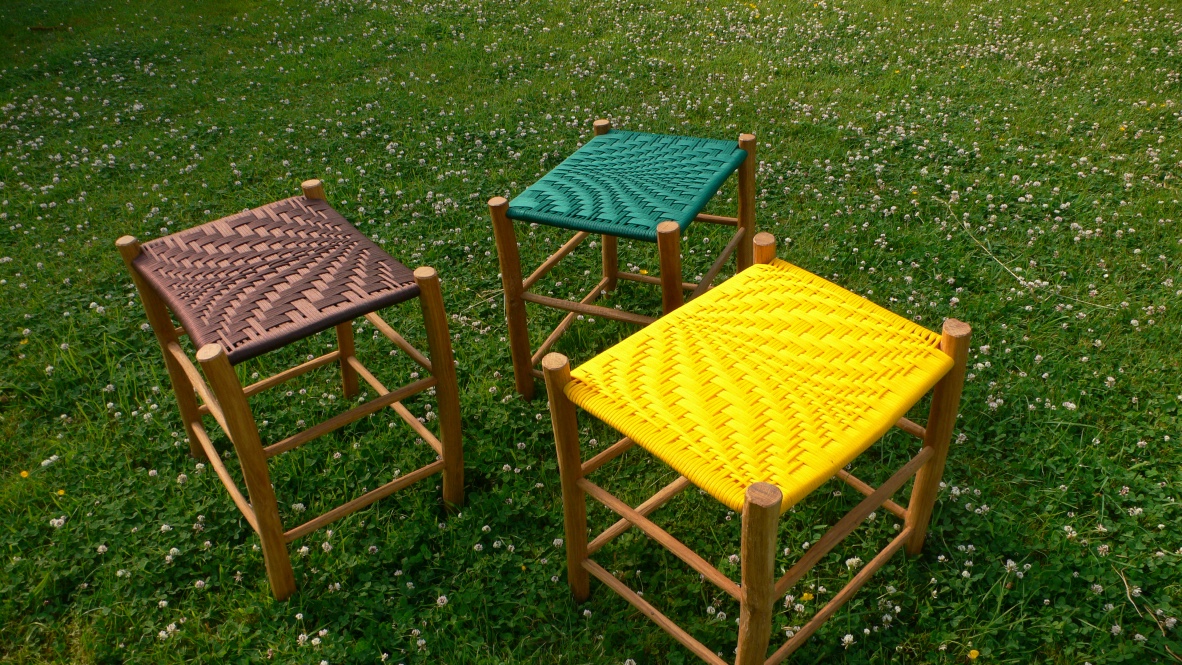
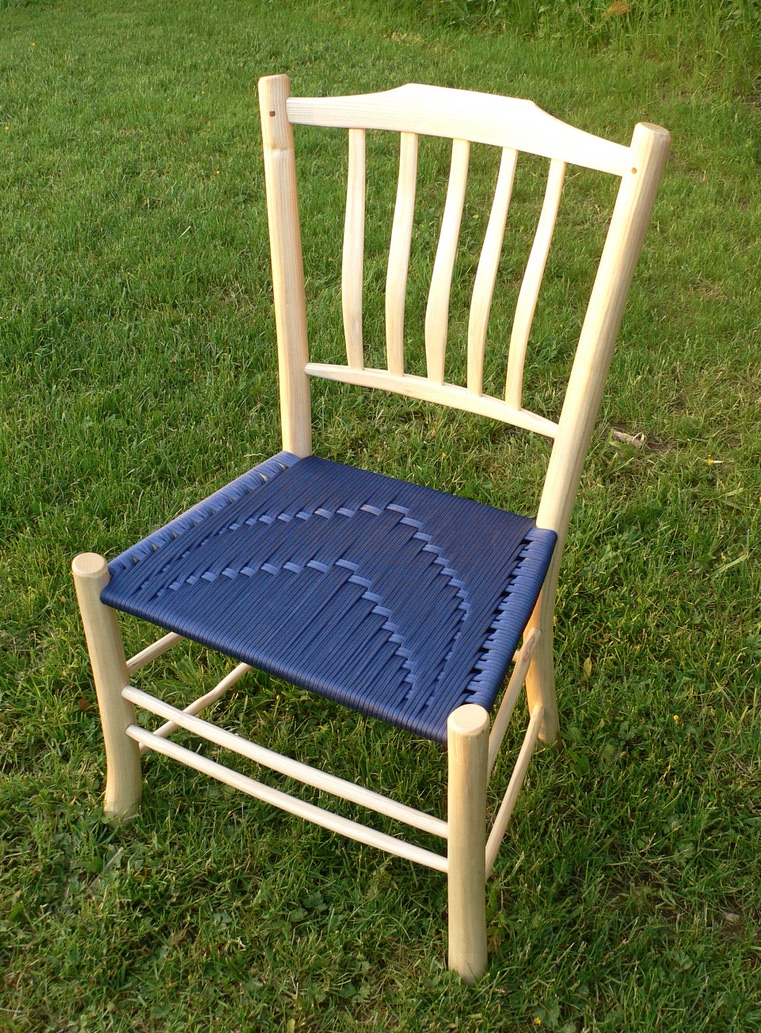
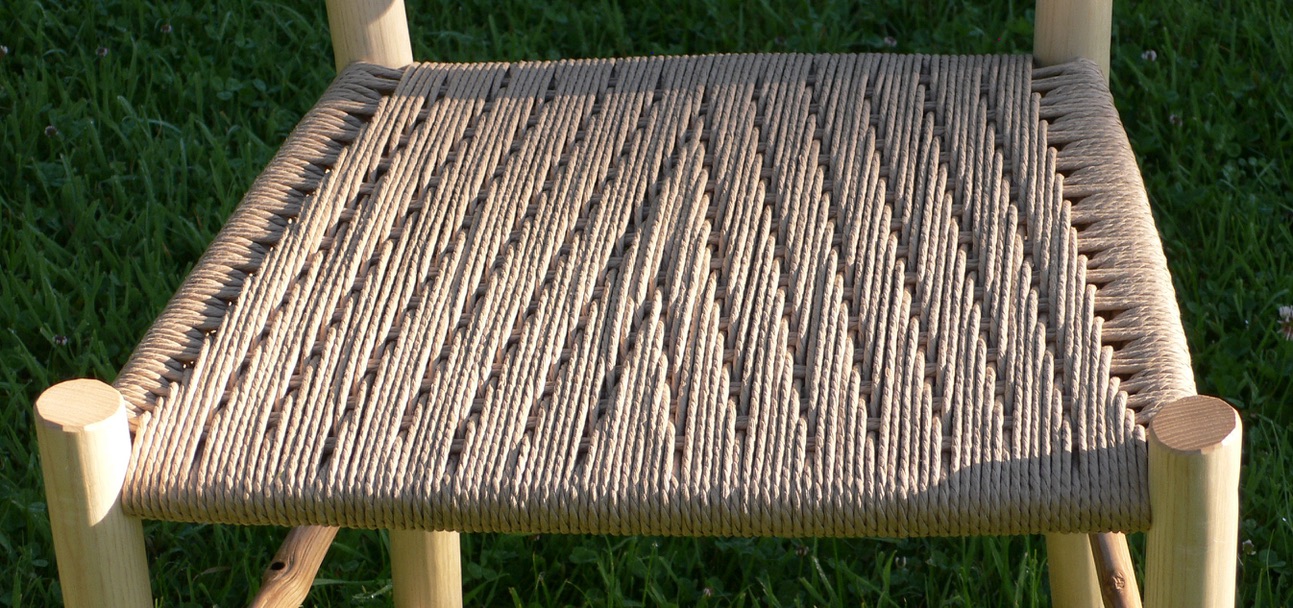
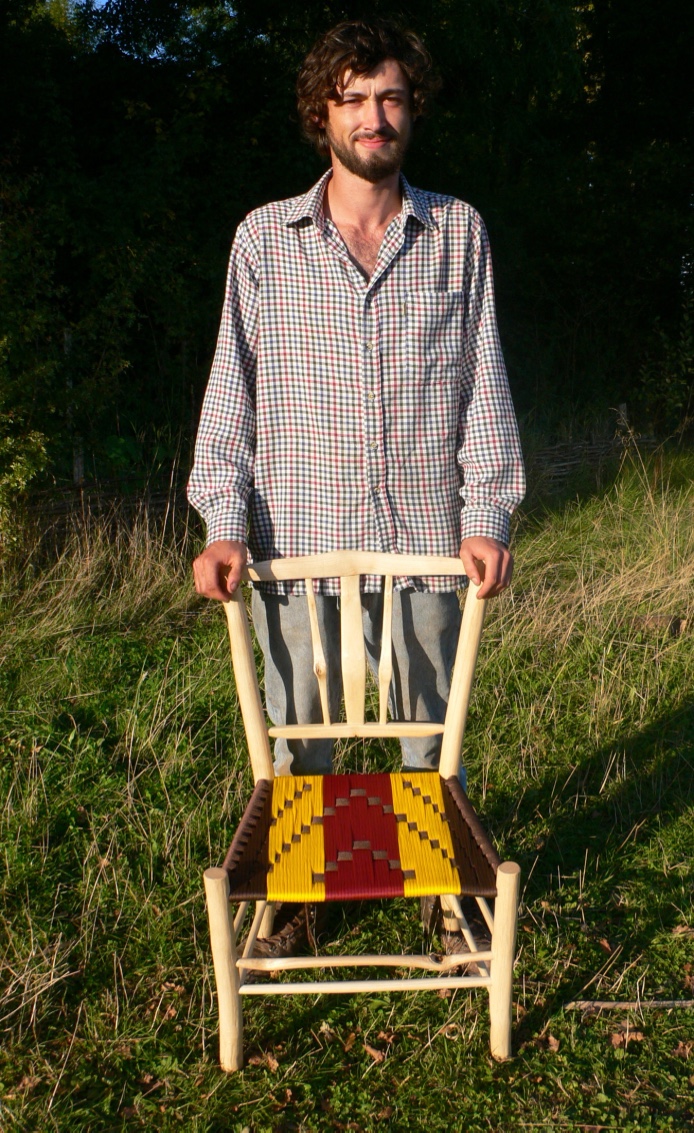
Chapter 19 – Seat weaving
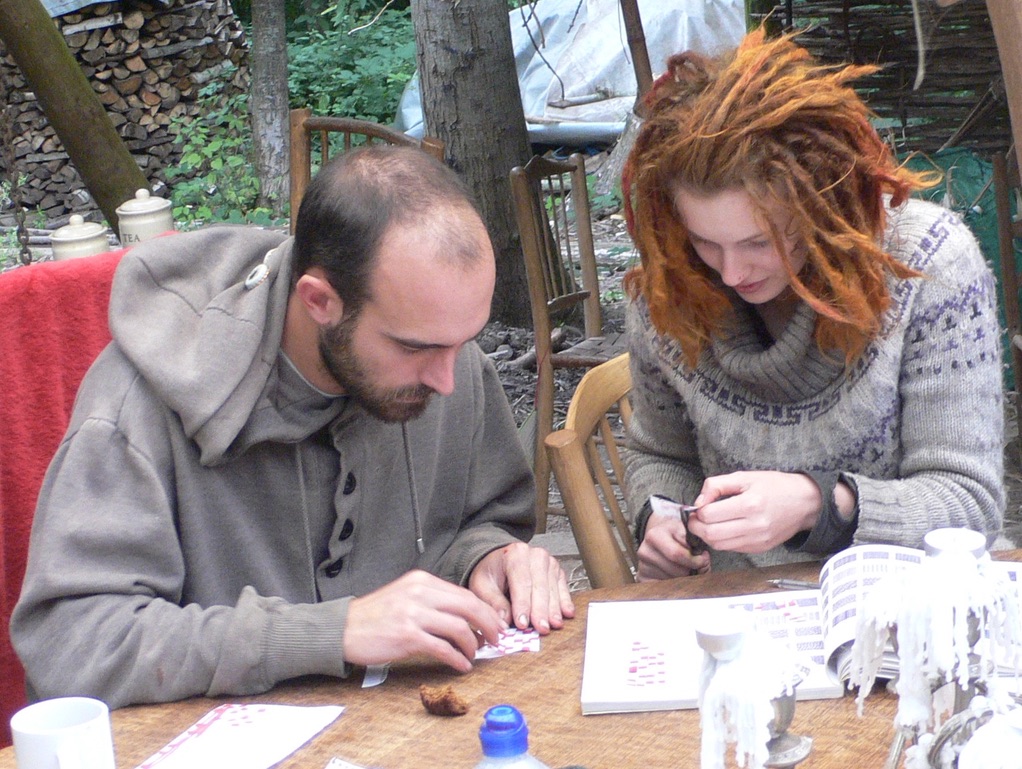
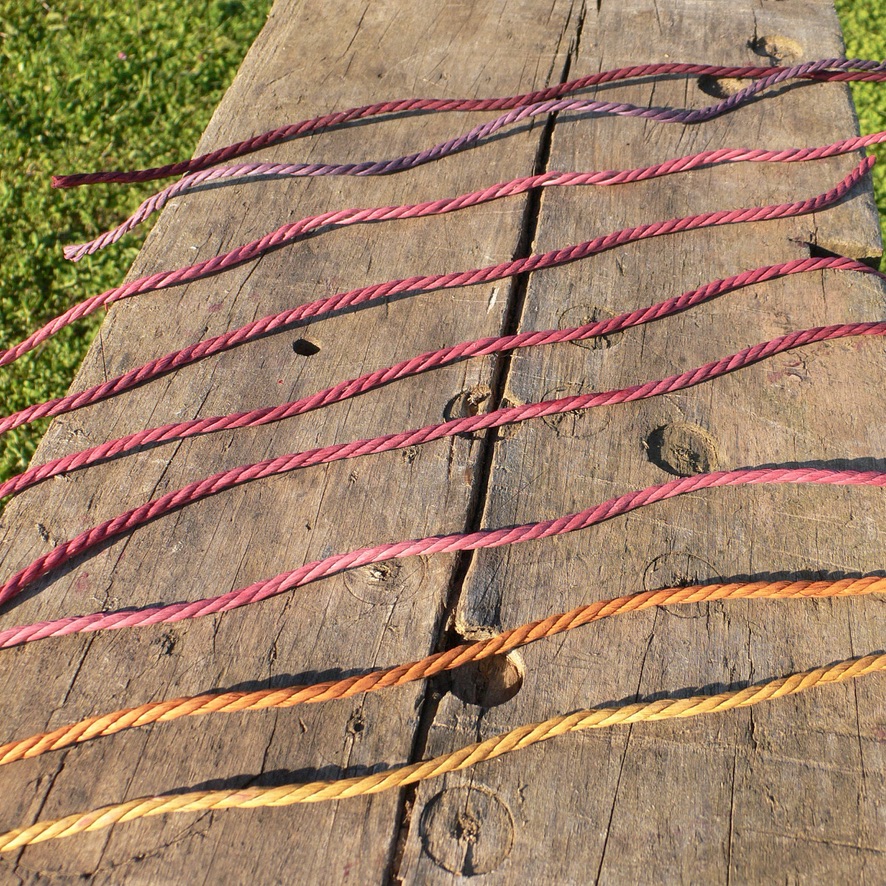
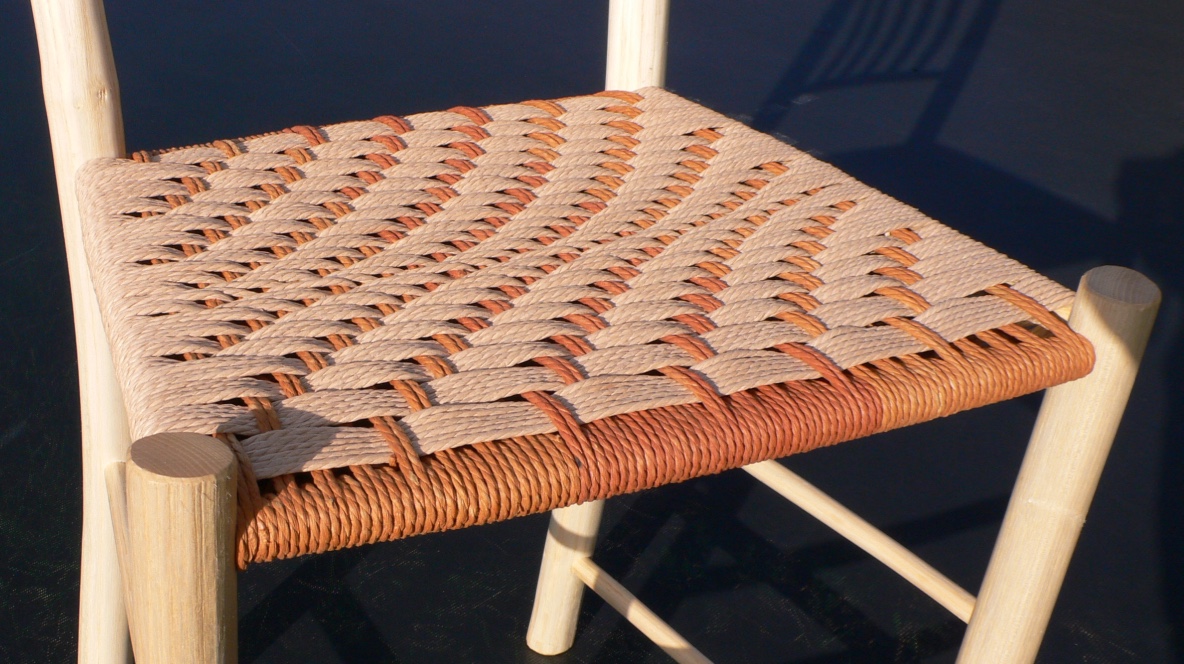
As with Chapter 18 – Making a wee-wor chair, ideas have moved on a lot since 2013. The best way to describe the techniques would be a sequence of stop-frame photos but I’m afraid you will have to wait for that one too! In the meantime here are a few photos from the recent archives.


So there you have it, and I hope this will add to your appreciation of Going with the Grain.
It looks as if I have several months ahead in which to write up the new approach to assembling chairs and to edit and post the bits of video. Any comments, either positive or negative will be well received and I look forward to summer 2021, after my 70th birthday, when I hope to be running courses again in our blissful rural retreat!

You must be logged in to post a comment.