Lots of things have coincided over the last few days (activity on Facebook, thinking about new books, telly prog on vlogging, settling into semi-retirement) and a few people have referred to odd pages from my second book. I’ve searched through my files and found some of the text but the actual proofs are with the printers and I’m not going to chase them up. So here are a few sections of text and I’ll slot in some photos from the pages to go with them. I’m sorry about the quality of the pics, taken with the pages of the book curved open. I’m afraid the fig numbers don’t match the photos of the finished book. Obviously if you want higher quality, then you can order a copy of the book from the ‘books’ page on this website. You will also get to see the remaining 237 pages! I think I’ve even managed to put a link to a video on cleaving some big lengths of wood.
Bookmark and paper knife set (fig 12.14)

This project demonstrates nicely the flexing properties of wood that are so seldom utilised. It requires great precision with the drawknife which, when mastered, can be most effective.
- Start with a quickly grown ash log (with growth rings of at least 3mm (1/8”) for flexibility)
- Cut it to about 30 cm (12”) long and, as with the rounders bat, cleave, trim, shave and rough out a cylinder, this time about 40 mm diameter.
- I suggest turning two sets of bookmarks end to end so that you can grip one while shaving the other
- Turn a shape you like, tapering at each end. Both ends can be quite different. I like to burn some lines onto the workpiece using the technique described overleaf but this is maybe a bit much for a beginner.
- When you have made finished turning, remove the workpiece from the lathe and grip one end in the shaving horse with the other end pointing towards you.
- Using a sharp drawknife, remove a series of shavings about a millimetre thick. These should retain the silhouette that you turned and they will be the book marks. (fig 12.15)

Shaving off the bookmarks
- When you have shaved away several bookmarks from one end, turn it end to end in the shaving horse and work on the other end, producing another crop of book marks.
- Turn the workpiece upside down and work on the other side of both ends. You will be amazed how many slices you have produced. Most of them will end up as kindling at first but with practice, you should get dozens of bookmarks out of one blank
- When left with the central piece at one end about 8 mm (3/8”) thick, shape it into a paper knife
- Repeat this at the other end
- Saw the two paper knives apart and there you have it.
I have had two rubber stamps made up saying:
A slice of Herefordshire
And www.living-wood.co.uk
I stamp one of these on each side of the bookmarks and give them away at craft demonstrations to kids and Americans tourists for 20p apiece in a charity box.
Cleaving
Cleaving is a very simple yet effective way of dividing a length of wood along its length without the need for any machinery. It is also sometimes referred to as riving and both terms refer to a refined form of splitting.
The basic theory of cleaving is very simple. Some kind of wedge shaped object is forced into the end of a log to prize the fibres apart. At right angles to the growth rings are the rays. These are like small ribbons buried within the log. In some timbers like oak, they are very obvious. In other timbers like ash, they are barely visible. Either way, they act as lines along which it is easier to prize apart the fibres of the log. This is referred to as cleaving radially and is generally the easiest way to cleave a log.
There are two quite distinct approaches to cleaving a piece of wood depending whether it is sturdy or slender.
Cleaving sturdy logs

If the wood is short and fat, such as a lump of firewood, the two halves will generally fly apart and the split will run straight along the flow of the fibres. This is the natural tendency for wood to split apart along the flow of the fibres – to go with the grain.
If you are cleaving a fairly large log, the usual approach is to cleave it into two equal halves using a number of wedges and a heavy object to drive them into the wood. A collection of old axe heads, a few plastic or wooden wedges and a large wooden maul are what I recommend here’s a short video. Apart from large knots, a factor to take into account is where the pith lies within the log. (This is the soft bit from which the growth ring emanate). If the pith is in the centre of the log, the best approach is to look for any existing splits in the end of the log and start cleaving from there. If the pith is off to one side, then you should try to start your split as shown (13?). This ensures two fairly even halves which should entice the split to run straight down the middle You will see why below
Cleaving slender sections
The real skill comes in when cleaving more slender sections, such as hazel rods to make hurdles or in our case, when cleaving the back legs for the chair. As a rule of thumb, I call it a slender log if its length is more than about 7 times its width. In this case, the wood is able to flex as the wedge is driven in.
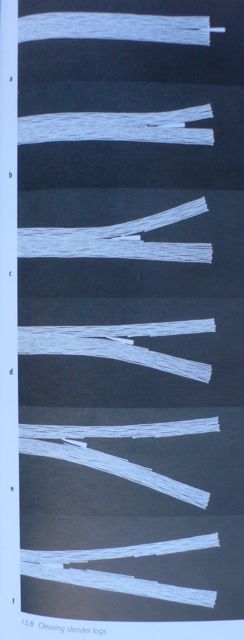
If both halves flex equally, the split will probably run straight along the grain. If on the other hand, one half is able to flex more than the other, the split will tend to run off towards the half that is flexing more. I cannot explain why. It depends greatly on the quality of the wood. If it is brittle, it will easily shear off to one side. If it is supple and fibrous, there is a much better chance of it following the grain.
With practice, you can utilise this property of green wood and actually steer the direction of the split as it runs along the length of wood. To do this you will need something more sophisticated than a simple wedge to prize the log open. The usual answer is a tool called a froe and some kind of cleaving brake as described on P?
Support the log on the cleaving brake and use a wooden club to knock the back of the froe blade into the end-grain. Whenever possible, aim to split the log into two parts that are likely to flex equally. Once the blade of the froe is completely buried in the wood, lever the log open by pushing down on the handle of the froe. This twists the blade within the wood which will normally force both halves of the log to flex apart.
If all goes well, the split will run nice and straight along the log. You can insert a wedge into the split to hold it open while you slide the froe along ready to lever it and force the split to continue. Avoid putting your hand into the opening, as it could close again with a vice-like grip. Keep going like this until the log falls in two.
If however, the split starts to run off to one side, you will have to try your best to counteract it. You will have to try to force the bigger half to flex more than the smaller half. (please forgive my imprecise use of the word ‘half’’) in the hope that this will force the split back into line.
Grip the wood in the cleaving brake with the bigger half to the bottom and bear down with both hands onto the blade of the froe attempting to flex the bigger half. (Before trying this, make sure that the blade of the froe is kept a bit blunt so as not to inflict a cut) Then lever the handle of the froe downwards, probably with your elbow, to hopefully drive the split to open back towards the centre of the log. Once it is running straight again, try to keep both halves of the log flexing equally. This probably sounds a bit weird but it is astonishing just how much control you can exert over the way a split runs along a log.
Although the general rule is to cleave in half, with experience and with good logs, you should be able to cleave into thirds. With larger logs you will be able to start cleaving tangentially (see?). You will find however, that older trees tend to become more brittle so the best results when bending, will be gained from younger trees, the ideal being around 30 years old.
This is just a very basic description of the process and there are dozens of little subtleties. Like learning to drive a car or to use a chainsaw, the art of cleaving can really only be learnt in a hands-on situation. However, it is worth taking time to practice this process and once you have mastered it you will be able to produce top quality lengths of timber from virtually worthless firewood without the need of any powered machinery.


You must be logged in to post a comment.